Preface
Who this book is for
This playbook is for engineers moving from individual test scripts to dependable automation systems. You should be comfortable reading Python and basic HTML. If you are new to browser automation, start with the setup guide and Chapters 1–2; if you own a framework, begin with Chapters 17–18.
The central question is simple: what evidence would convince you that the system did the right thing? A green test, a quiet network, or a confident model response is only a signal. Good architecture connects those signals to an observable outcome.
Read around a problem
| Your problem | Read next | Leave with |
|---|---|---|
| Tests pass locally and fail in CI | Chapters 1–3, then 18 | A failure classification and a reproducible waiting condition |
| UI changes keep breaking the suite | Chapters 4, 9–11, and 15 | Locator contracts and assertions that detect meaningful regressions |
| Your framework is expensive to maintain | Chapters 5–6 and 17–20 | A layering decision, isolated test data, and a measured execution budget |
| You are adding AI or autonomous tools | Chapters 12–13 and 23–25 | Separate integration tests, model evaluations, and agent execution checks |
How to use the examples
Each chapter starts with an outcome and a practical checkpoint. Code fragments explain a technique; they are not a complete application or a promise of compatibility with every package version. Supply your own fixtures, URLs, credentials, and teardown. Check the linked project documentation, pin the versions you validate, and run examples in a disposable test environment.
The tools illustrate design decisions. Compare their behavior with the standard capabilities of your test framework before adding another dependency. Chapters 24–25 describe proposed architectures, with explicit limits and validation criteria.
Three principles
- Make outcomes observable. Define the assertion before choosing the wait or the tool.
- Keep failures explainable. Capture the first failure, inputs, versions, and relevant artifacts before retrying.
- Measure the tradeoff. Track runtime, false positives, maintenance effort, and missed regressions on your own suite.
Prerequisites & Setup Guide
A reproducible starting point
Use a supported Python version compatible with the tools you choose, a current browser, Git, and an isolated virtual environment. For JavaScript examples, choose a supported Node.js LTS release from the official release schedule.
python --version
python -m venv .venv
# Activate on macOS / Linux:
source .venv/bin/activate
# Or in Windows PowerShell:
# .venv\Scripts\Activate.ps1
python -m pip install --upgrade pip
python -m pip install selenium pytest requests
python -m pip freeze > requirements.lock.txt
Commit the dependency lock after validating your environment. Record the browser and operating-system versions alongside test artifacts so local and CI failures can be compared.
Browser drivers
Selenium Manager is included in modern Selenium releases and resolves drivers when none is supplied. Restricted networks and offline CI may need pre-provisioned browser and driver binaries.
Your first reproducible test
Save this as test_smoke.py and run python -m pytest -q. It uses an in-memory page, so it does not depend on an external application.
from urllib.parse import quote
from selenium import webdriver
from selenium.webdriver.common.by import By

def test_browser_smoke():
    driver = webdriver.Chrome()
    try:
        html = "<title>Playbook lab</title><h1>Ready</h1>"
        driver.get("data:text/html;charset=utf-8," + quote(html))
        assert driver.title == "Playbook lab"
        assert driver.find_element(By.TAG_NAME, "h1").text == "Ready"
    finally:
        driver.quit()
Choose a waiting contract
Wait for the outcome relevant to your test. Page loading does not guarantee that application state is ready, and mixing implicit and explicit Selenium waits can make timeout behavior unpredictable. See Selenium waiting strategies and Playwright actionability checks. An actionable click still needs a business-result assertion.
PART I: FOUNDATIONS
Understanding the Platform Before Building On It
"You cannot truly master a tool until you understand the substrate it operates on."
Before writing a single line of automation code, you need to understand what's actually happening inside the browser. This knowledge separates automation engineers who can debug any problem from those who copy-paste Stack Overflow answers and hope for the best.
Chapter 1: How Browsers Actually Work
Why This Chapter Matters
Many browser automation failures become easier to diagnose when you understand rendering, events, and element lifecycles. Other failures come from test data, services, infrastructure, or the test itself.
ElementNotInteractableException— The browser says the element isn't readyStaleElementReferenceException— The DOM changed while you were looking at itTimeoutException— Something took longer than expected- Element found but click doesn't work — Event handlers aren't attached yet
Understanding browser internals transforms these from "random failures" into predictable, fixable problems.
The Browser's Multi-Process Architecture
Modern browsers like Chrome are not a single program—they're a collection of processes working together. This architecture was designed for security and stability, but it has profound implications for automation.
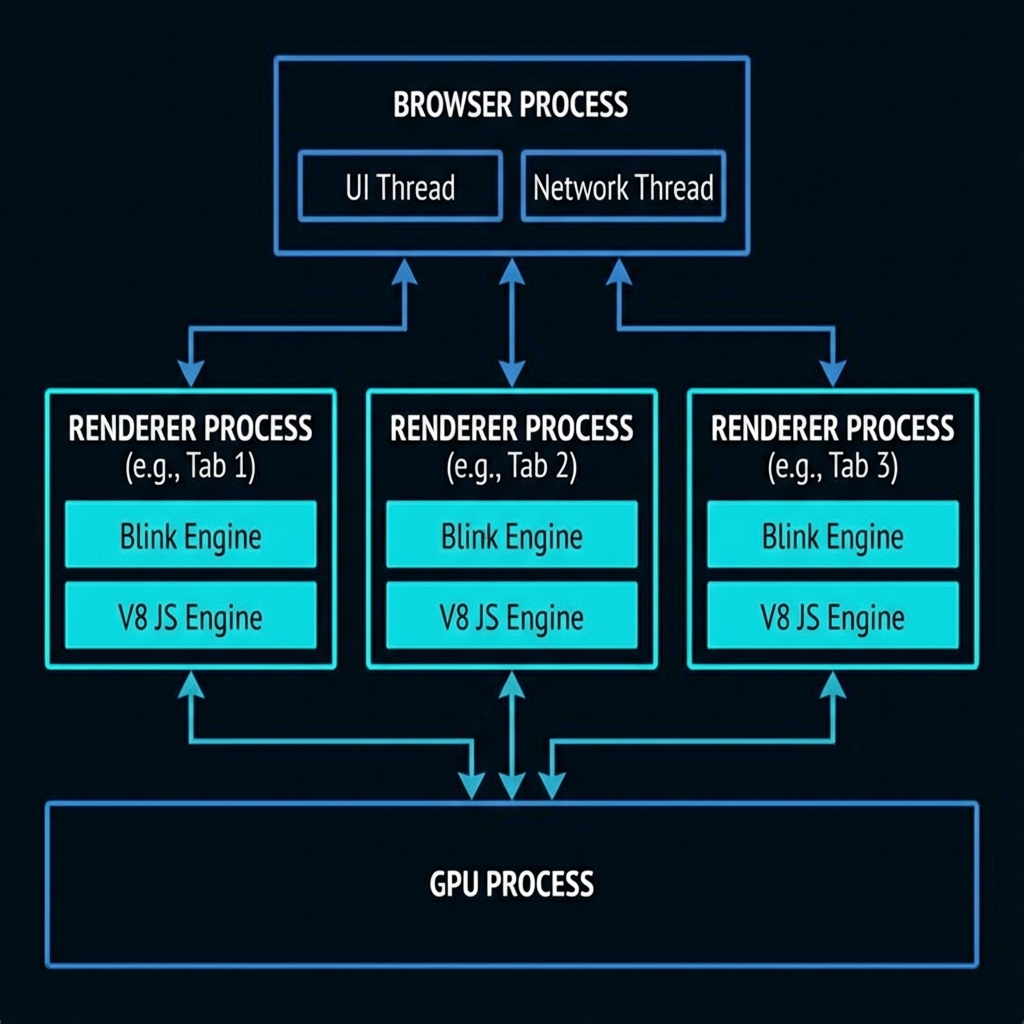
The Process Model
┌─────────────────────────────────────────────────────────────────────┐
│                        BROWSER PROCESS                               │
│  • UI (tabs, address bar, bookmarks)                                │
│  • Network requests                                                  │
│  • Storage management                                                │
│  • Inter-Process Communication (IPC) hub                            │
└────────────┬─────────────────────────────────────────┬──────────────┘
             │                                         │
             ▼                                         ▼
┌────────────────────────────┐          ┌────────────────────────────┐
│     RENDERER PROCESS #1    │          │     RENDERER PROCESS #2    │
│     (Tab 1: example.com)   │          │     (Tab 2: google.com)    │
│  ┌──────────────────────┐  │          │  ┌──────────────────────┐  │
│  │    Blink Engine      │  │          │  │    Blink Engine      │  │
│  │  • HTML Parser       │  │          │  │  • HTML Parser       │  │
│  │  • CSS Engine        │  │          │  │  • CSS Engine        │  │
│  │  • Layout Engine     │  │          │  │  • Layout Engine     │  │
│  └──────────────────────┘  │          │  └──────────────────────┘  │
│  ┌──────────────────────┐  │          │  ┌──────────────────────┐  │
│  │    V8 JavaScript     │  │          │  │    V8 JavaScript     │  │
│  │    Engine            │  │          │  │    Engine            │  │
│  └──────────────────────┘  │          │  └──────────────────────┘  │
    🔍 Deep Dive: V8 Bindings & The DOM Bridge
    JavaScript doesn't "own" the DOM. The DOM lives in the C++ core of the browser engine (Blink). When you call
        document.getElementById(), you're crossing a "bridge" from the JavaScript world (V8) to the C++
        world. This context switching is expensive. In high-frequency automation, hundreds of these crossings occur
        every second, creating a performance bottleneck that can look like network latency.
└────────────────────────────┘          └────────────────────────────┘
             │
             ▼
┌────────────────────────────┐
│       GPU PROCESS          │
│  • Compositing layers      │
│  • WebGL rendering         │
│  • Video decoding          │
└────────────────────────────┘
What This Means for Automation
Key Insight #1: Each tab is isolated
When you open a new browser window or tab in Selenium, you're potentially creating a new renderer process. Cookies, localStorage, and JavaScript state are shared per-origin, but memory and execution are isolated.
Key Insight #2: JavaScript runs in the renderer process
When you call driver.execute_script(), your JavaScript runs in the renderer process—the same place
the website's JavaScript runs. This is why you can access document, window, and the
DOM directly.
Key Insight #3: Network requests go through the browser process
This is why some bot detection techniques work—they can observe network behavior at the browser level, not just at the page level.
The Rendering Pipeline: From HTML to Pixels
When you navigate to a URL, here's what happens inside the browser:
Stage 1: Network Fetch
URL Entered → DNS Lookup → TCP Connection → TLS Handshake → HTTP Request → Response
The browser process handles this. The response (HTML, CSS, JS, images) streams back.
Stage 2: HTML Parsing and DOM Construction
<!-- This HTML... -->
<html>
  <body>
    <div id="container">
      <button id="submit">Click Me</button>
    </div>
  </body>
</html>
<!-- ...becomes this DOM tree -->
Document
  └── html
       └── body
            └── div#container
                 └── button#submit
                      └── TextNode: "Click Me"
💡 Key Insight: The DOM is a live tree structure
When you call driver.find_element(By.ID, "submit"), Selenium traverses this tree. If the tree
changes (React re-renders, Ajax loads content), your reference might become "stale."
Stage 3: CSS Parsing and CSSOM Construction
/* This CSS... */
#container {
  display: flex;
}
button {
  background: blue;
  padding: 10px;
}
/* ...becomes the CSSOM */
StyleSheetList
  └── CSSStyleSheet
       └── #container { display: flex }
       └── button { background: blue; padding: 10px }
Stage 4: The Render Tree
The DOM and CSSOM combine to create the Render Tree—only visible elements are included:
RenderTree
  └── RenderBody
       └── RenderDiv (display: flex)
            └── RenderButton (background: blue, padding: 10px)
                 └── RenderText: "Click Me"
💡 Key Insight: Elements with display: none are NOT in the render tree
This is why element.is_displayed() returns False for hidden elements—they literally
don't exist in the visual representation.
Stage 5: Layout (Reflow)
The browser calculates the exact position and size of every element:
button#submit:
  x: 150px
  y: 200px
  width: 80px
  height: 40px
⚠️ Common Pitfall: Layout is expensive
Every time the DOM changes, layout might need to recalculate. This is why tests that rapidly modify the DOM can become slow.
Stage 6: Paint and Composite
Finally, the browser: 1. Paints each layer (turns elements into pixels) 2. Composites layers together (stacking order, transparency) 3. Sends to GPU for display
🔍 Deep Dive: The Compositor vs. Main Thread
A common automation mystery: The element is visible, but the click fails. This often happens because of thread contention. The Compositor Thread (which handles scrolling and some animations) is separate from the Main Thread (which handles JS and Layout). If the Main Thread is blocked by a long-running script, the browser can still scroll (compositor), but it cannot process a click (main thread). Automation stability requires the Main Thread to be "idle."
The JavaScript Event Loop
This is the most important concept for understanding flaky tests.
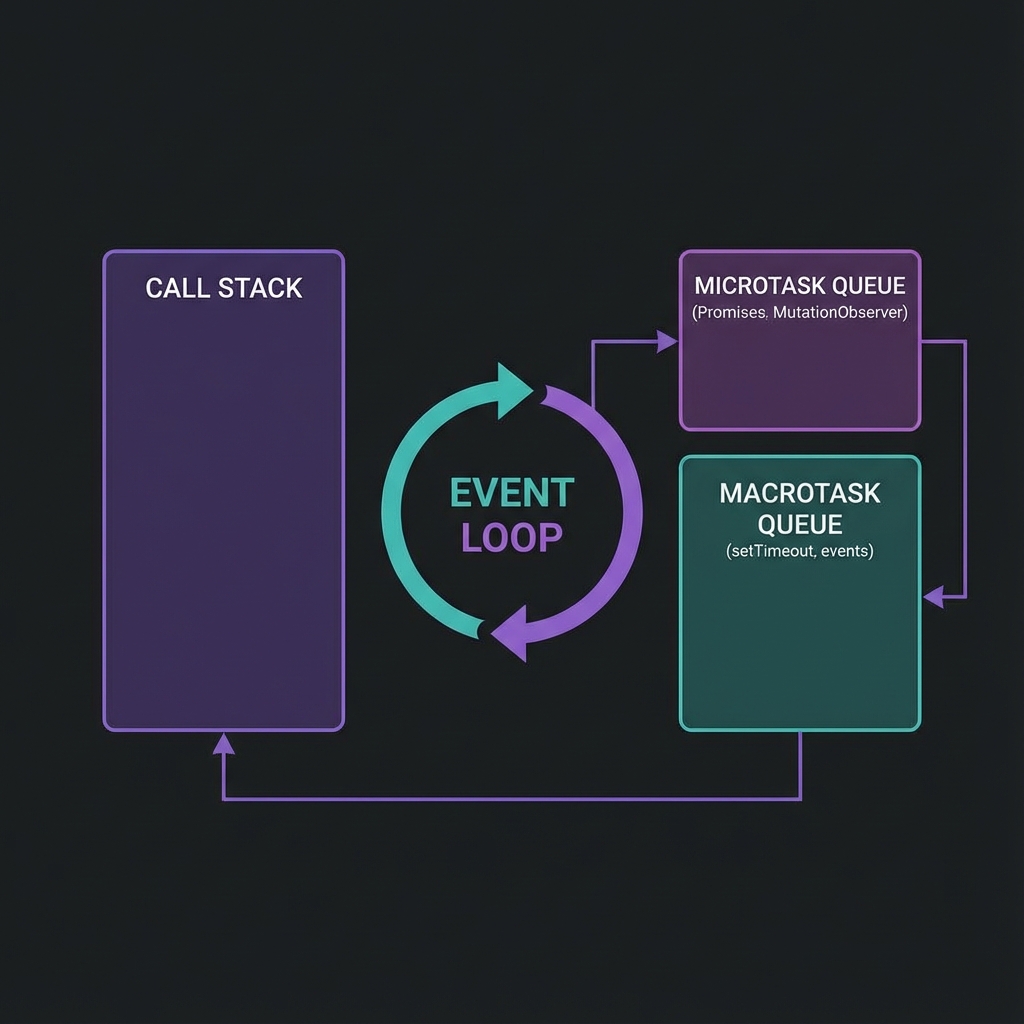
The Single-Threaded Nature of JavaScript
JavaScript in the browser runs on a single thread. There's no true parallelism—everything happens one step at a time. But it doesn't feel single-threaded because of the Event Loop.
┌─────────────────────────────────────────────────────────────────┐
│                         EVENT LOOP                               │
│                                                                  │
│  ┌─────────────────┐    ┌────────────────────────────────────┐  │
│  │   Call Stack    │    │           Task Queues               │  │
│  │                 │    │  ┌──────────────────────────────┐  │  │
│  │  Currently      │◄───│  │ Macrotask Queue              │  │  │
│  │  executing      │    │  │ • setTimeout callbacks       │  │  │
│  │  code           │    │  │ • setInterval callbacks      │  │  │
│  │                 │    │  │ • I/O operations             │  │  │
│  └─────────────────┘    │  │ • UI rendering               │  │  │
│                         │  └──────────────────────────────┘  │  │
│                         │  ┌──────────────────────────────┐  │  │
│                         │  │ Microtask Queue              │  │  │
│                         │  │ • Promise callbacks          │  │  │
│                         │  │ • MutationObserver           │  │  │
│                         │  │ • queueMicrotask()           │  │  │
│                         │  └──────────────────────────────┘  │  │
│                         └────────────────────────────────────┘  │
└─────────────────────────────────────────────────────────────────┘
How the Event Loop Works
- Execute all code in the Call Stack until it's empty
- Process all tasks in the Microtask Queue (Promises, MutationObserver)
- Process ONE task from the Macrotask Queue (setTimeout, events)
- Render (if needed)
- Repeat
Why This Matters for Automation
// Website code
button.addEventListener('click', async () => {
    await fetch('/api/data');  // Network request
    updateUI();  // Updates the DOM
});
When your Selenium test clicks the button:
- Click event fires ✓
- Event handler starts executing ✓
fetch()is called (goes to microtask queue) ✓- Event handler returns immediately ✓
- Your test continues...
- BUT the DOM hasn't updated yet!
This is the #1 cause of flaky tests: assuming synchronous completion.
The Solution: Proper Waiting
# ❌ BAD: Assumes synchronous completion
driver.find_element(By.ID, "button").click()
result = driver.find_element(By.ID, "result").text  # May fail!

# ✅ GOOD: Waits for the expected outcome
driver.find_element(By.ID, "button").click()
WebDriverWait(driver, 10).until(
    EC.text_to_be_present_in_element((By.ID, "result"), "Success")
)
Page Load Events: When Is a Page "Ready"?
The Loading Timeline
┌──────────────────────────────────────────────────────────────────┐
│                     PAGE LOADING TIMELINE                         │
├──────────────────────────────────────────────────────────────────┤
│                                                                   │
│  Navigation Start                                                 │
│       │                                                           │
│       ▼                                                           │
│  HTML starts downloading ─────────────────────┐                   │
│       │                                       │                   │
│       ▼                                       ▼                   │
│  HTML fully parsed ◄─── DOMContentLoaded event fires              │
│       │                                                           │
│       ▼                                                           │
│  CSS, JS, Images loading ─────────────────────┐                   │
│       │                                       │                   │
│       ▼                                       ▼                   │
│  All resources loaded ◄───── load event fires                     │
│       │                                                           │
│       ▼                                                           │
│  Lazy resources, AJAX ─────────────────────────────┐              │
│       │                                            │              │
│       ▼                                            ▼              │
│  Fully interactive ◄───── NO STANDARD EVENT!                     │
│                                                                   │
└──────────────────────────────────────────────────────────────────┘
What Each Event Means
| Event | What's Ready | What's NOT Ready |
|---|---|---|
DOMContentLoaded |
HTML parsed, DOM built | CSS, images, fonts, external JS |
load |
All initial resources | Lazy-loaded content, AJAX data |
| (no event) | Everything | — |
The Problem for Automation
Selenium's driver.get(url) waits for the load event by default. But modern single-page
applications often:
- Load a minimal HTML shell (triggers
load) - Execute JavaScript that fetches data
- Render the actual UI
Your test starts after load, but the UI you need to interact with hasn't rendered yet!
Solutions
# Strategy 1: Wait for specific elements
driver.get("https://example.com")
WebDriverWait(driver, 20).until(
    EC.presence_of_element_located((By.ID, "main-content"))
)

# Strategy 2: Wait for network idle (using JavaScript)
driver.get("https://example.com")
driver.execute_script("""
    return new Promise(resolve => {
        if (document.readyState === 'complete') {
            setTimeout(resolve, 500);  // Small buffer for AJAX
        } else {
            window.addEventListener('load', () => setTimeout(resolve, 500));
        }
    });
""")

# Strategy 3: Use Waitless (covered in Chapter 3)
from waitless import stabilize
driver = stabilize(webdriver.Chrome())
driver.get("https://example.com")  # Automatically waits for full stability
How WebDriver (Selenium) Talks to the Browser
Understanding this communication protocol helps debug "weird" failures.
The WebDriver Protocol
┌─────────────────┐     HTTP/REST      ┌─────────────────┐
│                 │─────────────────────│                 │
│   Your Test     │   {"using": "id",  │   ChromeDriver  │
│   (Python)      │    "value": "btn"} │   (Executable)  │
│                 │◄────────────────────│                 │
└─────────────────┘   {"value": {...}} └────────┬────────┘
                                                │
                                                │ Chrome DevTools
                                                │ Protocol (CDP)
                                                │
                                        ┌───────▼────────┐
                                        │                │
                                        │     Chrome     │
                                        │    Browser     │
                                        │                │
                                        └────────────────┘
What Happens When You Call find_element()
element = driver.find_element(By.ID, "submit-button")
- Your code calls Selenium's Python binding
- Selenium sends HTTP POST to ChromeDriver:
json POST /session/{sessionId}/element {"using": "css selector", "value": "#submit-button"} - ChromeDriver translates to CDP command
- Chrome executes
document.querySelector("#submit-button") - Chrome returns element reference to ChromeDriver
- ChromeDriver returns JSON response:
json {"value": {"element-6066-11e4-a52e-4f735466cecf": "abc123"}} - Selenium wraps this in a
WebElementobject
Why Elements Become "Stale"
That "abc123" is a reference ID. If the DOM element is removed and re-added (common
in React/Vue/Angular), the old reference ID is invalid—hence StaleElementReferenceException.
The Chrome DevTools Protocol (CDP)
Selenium 4 introduced direct CDP access, unlocking powerful capabilities:
# Traditional WebDriver (limited)
driver.get("https://example.com")

# Direct CDP access (powerful)
driver.execute_cdp_cmd("Network.enable", {})
driver.execute_cdp_cmd("Network.setExtraHTTPHeaders", {
    "headers": {"X-Custom-Header": "my-value"}
})

# Listen to network events
driver.execute_cdp_cmd("Network.enable", {})
# Now you can capture all network requests/responses
Key CDP Domains for Testing
| Domain | Capabilities |
|---|---|
Network |
Intercept requests, mock responses, throttle bandwidth |
DOM |
Query/modify DOM, track mutations |
Performance |
Collect metrics, trace execution |
Console |
Capture console.log output |
Emulation |
Spoof device, geolocation, timezone |
🔍 Deep Dive: The Hidden Latency - Cost of a WebDriver Command
Every Selenium command (e.g., element.is_displayed()) is an out-of-process network call. Even
on localhost, there is overhead for serialization, network transmission, and deserialization. When you put a
find_element call inside a tight loop, you're not just waiting for the browser; you're paying a
"tax" of 5-10ms per call just for the communication protocol itself. This is why batching interactions in
JavaScript (using execute_script) is often 10x faster for complex tasks.
🔧 Hands-On Exercise: Exploring Browser Internals
Let's apply what we've learned:
from selenium import webdriver
from selenium.webdriver.common.by import By
import time

driver = webdriver.Chrome()

# 1. Navigate and observe loading
driver.get("https://example.com")
print(f"Page load complete. Title: {driver.title}")

# 2. Explore the DOM
dom_html = driver.execute_script("return document.documentElement.outerHTML.length")
print(f"Total DOM size: {dom_html} characters")

# 3. Check event loop status
pending_tasks = driver.execute_script("""
    return {
        readyState: document.readyState,
        animationsPending: document.getAnimations().filter(a => a.playState === 'running').length
    }
""")
print(f"Document state: {pending_tasks['readyState']}")
print(f"Running animations: {pending_tasks['animationsPending']}")

# 4. Monitor a mutation
driver.execute_script("""
    window.__mutations = [];
    const observer = new MutationObserver(mutations => {
        mutations.forEach(m => window.__mutations.push(m.type));
    });
    observer.observe(document.body, {childList: true, subtree: true});
""")

# Make a DOM change
driver.execute_script("document.body.innerHTML += '<div>Test</div>'")

mutations = driver.execute_script("return window.__mutations")
print(f"Mutations observed: {mutations}")

driver.quit()
Expected Output:
Page load complete. Title: Example Domain
Total DOM size: 1234 characters
Document state: complete
Running animations: 0
Mutations observed: ['childList']
📋 Chapter 1 Summary
| Concept | Key Takeaway |
|---|---|
| Multi-Process Architecture | Each tab runs in isolation; crashes don't affect other tabs |
| Rendering Pipeline | HTML → DOM → CSSOM → Render Tree → Layout → Paint |
| Event Loop | Single-threaded but async; explains why clicks don't wait |
| Page Load Events | load event fires before AJAX content is ready |
| WebDriver Protocol | HTTP/JSON commands translated to CDP |
| Stale Elements | DOM changes invalidate element references |
Coming up next: Now that you understand the platform, let's explore why tests fail unpredictably—and how to analyze the root cause.
Chapter 2: The Anatomy of a Flaky Test
Understanding Why Tests Fail Intermittently
Flaky tests are the silent killers of automation credibility. A test that passes on Monday, fails on Tuesday, and passes again on Wednesday—with zero code changes—destroys trust faster than any bug in production.
The True Cost of Flakiness
Consider these statistics from real enterprise environments:
| Metric | Impact |
|---|---|
| Developer time investigating false failures | 4-6 hours/week per engineer |
| Pipeline re-runs due to flaky tests | 15-25% of all runs |
| Confidence in test results | Drops below 60% |
| Time to detect real bugs | Increases by 40% |
When developers stop trusting test results, they stop looking at them. The automation suite becomes expensive decoration.
💡 Key Insight: Flakiness Is a Symptom, Not a Disease
Every flaky test has a deterministic root cause. The test isn't "randomly" failing—it's failing because of specific conditions that aren't always present. Your job is to find those conditions.
🔍 Deep Dive: The Micro-Stutter - GC and JIT Interference
Sometimes the browser itself stops responding for a few milliseconds. This happens during Garbage Collection (GC)—when V8 pauses execution to clean up memory—or Just-In-Time (JIT) Compilation. These "micro-stutters" are nearly invisible to humans but can cause a race condition to trigger in automation if the browser pauses exactly when a click is being sent. Stable automation builds in a small buffer for these unavoidable internal pauses.
Root Cause Analysis: The Five Categories of Flakiness
Category 1: Race Conditions
The browser and test script operate at different speeds. The script says "click the button" before the button is ready.
Symptoms:
- ElementNotInteractableException
- StaleElementReferenceException
- Tests pass locally, fail in CI
Example of the Problem:
# This code has a race condition
driver.get("https://app.example.com/dashboard")
driver.find_element(By.ID, "submit-btn").click()  # May fail!
The page is still loading when the click executes. The element might: - Not exist in the DOM yet - Exist but be covered by a loading overlay - Exist but be outside the viewport - Exist but have event handlers not yet attached
🔍 Deep Dive: Why Event Handlers Aren't Attached Immediately
<button id="submit-btn">Submit</button>
<script>
    // This runs after the button exists in DOM
    document.getElementById('submit-btn').addEventListener('click', handleClick);
</script>
The button is in the DOM immediately, but the event listener is only attached when the
<script> executes. If your test clicks before the script runs, nothing happens!
Solution Pattern:
from selenium.webdriver.support.ui import WebDriverWait
from selenium.webdriver.support import expected_conditions as EC

# Wait for element to be clickable (visible + enabled)
wait = WebDriverWait(driver, 10)
button = wait.until(EC.element_to_be_clickable((By.ID, "submit-btn")))
button.click()
Category 2: Network Variability
API calls complete at different speeds. A dashboard that loads in 200ms locally might take 2 seconds in CI.
Symptoms: - Tests timeout in CI but pass locally - Intermittent failures correlate with time of day - Tests fail more often on shared CI infrastructure
Why CI Is Different:
| Factor | Local Development | CI Environment |
|---|---|---|
| Network Latency | Near-zero (localhost) | Variable (shared infra) |
| CPU | Dedicated | Shared with other jobs |
| Memory | Abundant | Often limited |
| Browser Startup | Instant (browser cached) | Cold start each time |
Solution Pattern:
# ❌ BAD: Fixed timeout too short
wait = WebDriverWait(driver, 3)

# ✅ GOOD: Generous timeout with early exit
wait = WebDriverWait(driver, 30)  # Will return early if condition met
element = wait.until(EC.presence_of_element_located((By.ID, "data-loaded")))
Category 3: Animation Interference
CSS transitions and JavaScript animations don't block Selenium. The test clicks where the button will be, not where it is.
Example:
.modal {
    transition: transform 0.3s ease-in-out;
    transform: translateY(-100%);
}
.modal.open {
    transform: translateY(0);
}
The modal slides in over 300ms. Selenium doesn't wait for CSS transitions.
🔍 Deep Dive: How Animations Break Clicks
- Test finds element at position (100, 500) - where modal WILL be
- Browser reports element as "visible" because
opacity > 0anddisplay != none - Test sends click command to coordinates (100, 500)
- Animation is still in progress - element is actually at (100, 350)
- Click hits wrong element or nothing
Solution Pattern:
# Wait for all animations to complete
def wait_for_animations(driver):
    driver.execute_script("""
        return new Promise(resolve => {
            const checkAnimations = () => {
                const animations = document.getAnimations();
                const running = animations.filter(a => a.playState === 'running');
                if (running.length === 0) {
                    resolve();
                } else {
                    requestAnimationFrame(checkAnimations);
                }
            };
            checkAnimations();
        });
    """)

# Usage
driver.find_element(By.CLASS_NAME, "open-modal").click()
wait_for_animations(driver)
modal_button = driver.find_element(By.ID, "modal-confirm")
modal_button.click()
Category 4: External Dependencies
- Third-party services (payment gateways, OAuth providers)
- Shared databases with concurrent test runs
- Time-dependent logic (tests fail at midnight)
Solution Patterns:
# 1. Mock external services
@pytest.fixture
def mock_payment_gateway():
    with responses.RequestsMock() as rsps:
        rsps.add(
            responses.POST,
            "https://api.stripe.com/v1/charges",
            json={"id": "ch_test123", "status": "succeeded"},
            status=200
        )
        yield rsps

# 2. Isolate database
@pytest.fixture
def isolated_db_session():
    # Create unique schema per test
    schema_name = f"test_{uuid.uuid4().hex[:8]}"
    create_schema(schema_name)
    yield schema_name
    drop_schema(schema_name)

# 3. Control time
from freezegun import freeze_time

@freeze_time("2024-06-15 14:30:00")
def test_discount_during_sale_period():
    # Time-sensitive logic now predictable
    assert calculate_discount() == 0.20
Category 5: Resource Contention
- Insufficient memory causing slow garbage collection
- CPU contention on shared CI runners
- Browser instance limits exceeded
Symptoms: - Failures cluster at certain times (when CI is busy) - Memory-related crashes - "Chrome not reachable" errors
Solution Patterns:
# 1. Request dedicated CI resources
# .github/workflows/test.yml
jobs:
  test:
    runs-on: ubuntu-latest
    timeout-minutes: 30
    env:
      CHROME_ARGS: "--disable-dev-shm-usage --no-sandbox"

# 2. Limit parallel browser instances
# pytest.ini
[pytest]
addopts = -n 4  # Max 4 parallel workers

# 3. Add resource monitoring
import psutil

def check_system_resources():
    memory = psutil.virtual_memory()
    if memory.percent > 90:
        logging.warning(f"High memory usage: {memory.percent}%")
        # Consider failing fast rather than flaking
The Traditional Solutions (And Why They Don't Work)
Solution 1: time.sleep() - The Worst Fix
driver.get("https://app.example.com/dashboard")
time.sleep(5)  # "This should be enough time"
driver.find_element(By.ID, "submit-btn").click()
Problems: - Too slow: You wait 5 seconds even when the page loads in 500ms - Still flaky: Sometimes 5 seconds isn't enough - Compounds: 100 tests × 3 sleeps each × 5 seconds = 25 minutes wasted
Solution 2: Explicit Waits - Better But Incomplete
from selenium.webdriver.support.ui import WebDriverWait
from selenium.webdriver.support import expected_conditions as EC

wait = WebDriverWait(driver, 10)
element = wait.until(
    EC.element_to_be_clickable((By.ID, "submit-btn"))
)
element.click()
Improvements: - Returns as soon as condition is met - Has a timeout for failure cases - More descriptive failures
Remaining Problems: - Doesn't wait for network calls to complete - Doesn't wait for animations to finish - Doesn't detect JavaScript-driven readiness - Requires explicit waits everywhere in code
Solution 3: Custom Expected Conditions - High Maintenance
class all_animations_complete:
    def __call__(self, driver):
        return driver.execute_script("""
            return document.getAnimations().every(a =>
                a.playState === 'finished' || a.playState === 'idle'
            );
        """)

wait.until(all_animations_complete())
Problems: - Must remember to add this everywhere - Doesn't handle network calls - Complex to maintain across team
The Diagnostic Toolkit
Before jumping to solutions, you need to diagnose the specific cause of flakiness.
Tool 1: Retry Analysis
Run the flaky test 50+ times and analyze patterns:
# pytest_flaky_tracker.py
import pytest
import json
from datetime import datetime

RESULTS_FILE = "flaky_analysis.json"

@pytest.hookimpl(hookwrapper=True)
def pytest_runtest_makereport(item, call):
    outcome = yield
    report = outcome.get_result()

    if call.when == "call":
        result = {
            "test": item.name,
            "timestamp": datetime.now().isoformat(),
            "passed": report.passed,
            "duration": report.duration,
            "error": str(report.longrepr) if report.failed else None
        }

        # Append to results file
        try:
            with open(RESULTS_FILE, "r") as f:
                data = json.load(f)
        except FileNotFoundError:
            data = []

        data.append(result)

        with open(RESULTS_FILE, "w") as f:
            json.dump(data, f, indent=2)
Run analysis:
for i in {1..50}; do pytest test_flaky.py --tb=short; done
python analyze_flaky.py  # Analyze patterns
Tool 2: Screenshot on Failure
@pytest.fixture
def driver(request):
    driver = webdriver.Chrome()
    yield driver

    # Capture screenshot on failure
    if request.node.rep_call.failed:
        screenshot_dir = Path("screenshots")
        screenshot_dir.mkdir(exist_ok=True)

        filename = f"{request.node.name}_{datetime.now():%Y%m%d_%H%M%S}.png"
        driver.save_screenshot(str(screenshot_dir / filename))

    driver.quit()

@pytest.hookimpl(tryfirst=True, hookwrapper=True)
def pytest_runtest_makereport(item, call):
    outcome = yield
    rep = outcome.get_result()
    setattr(item, f"rep_{rep.when}", rep)
Tool 3: Network Log Capture
def enable_network_logging(driver):
    driver.execute_cdp_cmd("Network.enable", {})

def get_pending_requests(driver):
    # This requires more complex CDP subscription setup
    logs = driver.execute_script("""
        return window.performance.getEntriesByType('resource')
            .filter(e => e.responseEnd === 0)
            .map(e => e.name);
    """)
    return logs
📋 Chapter 2 Summary
| Flakiness Category | Percentage | Primary Solution |
|---|---|---|
| Race Conditions | 40% | Explicit waits for expected state |
| Network Variability | 25% | Generous timeouts, network mocking |
| Animation Interference | 15% | Wait for getAnimations() to settle |
| External Dependencies | 10% | Mock services, isolate data |
| Resource Contention | 10% | Dedicated resources, monitoring |
The Ultimate Solution: In the next chapter, we'll introduce Waitless, which addresses race conditions, network variability, AND animation interference automatically—with no code changes required.
Chapter 3: Waitless - Intelligent Stability Detection
A Fundamentally Different Approach
Instead of telling Selenium when to wait, Waitless instruments the browser itself to detect when waiting is no longer needed.
The Core Philosophy
Traditional approaches ask: "What should I wait for?"
Waitless asks: "What signals indicate the page is stable?"
The four signals of stability: 1. DOM settled — No elements being added/removed/modified 2. Network idle — No pending HTTP requests 3. Animations complete — No CSS or JavaScript animations running 4. Shadow Elements detected — Full support for encapsulated Shadow DOM stability
When all three are true, the page is ready for interaction.
🔍 Deep Dive: The Waitless Architecture
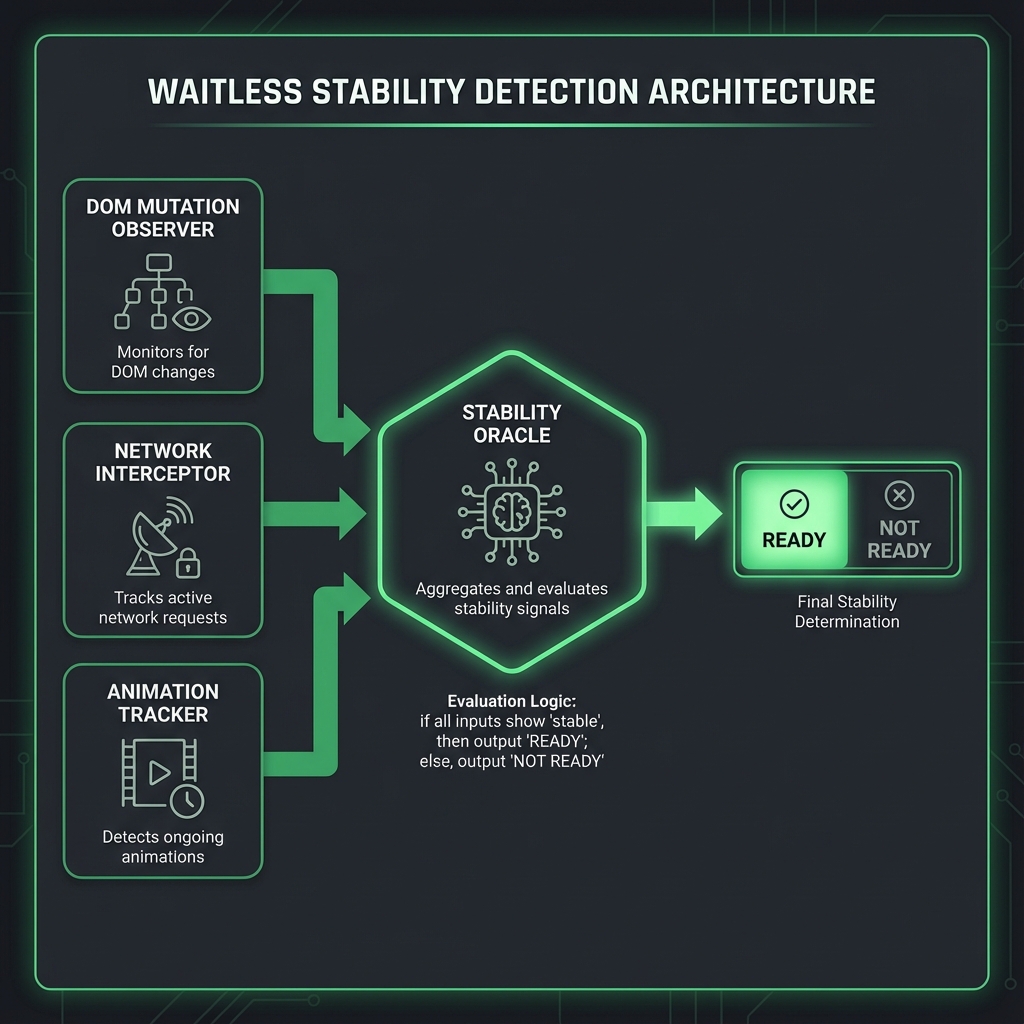
┌─────────────────────────────────────────────────────────────────┐
│                      YOUR TEST CODE                              │
│  driver.find_element(By.ID, "btn").click()                      │
└─────────────────────────────────────────────────────────────────┘
                              │
                              ▼
┌─────────────────────────────────────────────────────────────────┐
│                   WAITLESS WRAPPER                               │
│  • Intercepts all WebDriver commands                            │
│  • Injects stability checks before each action                  │
│  • No code changes required in your tests                       │
└─────────────────────────────────────────────────────────────────┘
                              │
                              ▼
┌─────────────────────────────────────────────────────────────────┐
│              BROWSER-SIDE INSTRUMENTATION                        │
│  ┌─────────────────┐ ┌─────────────────┐ ┌─────────────────┐   │
│  │    Mutation     │ │    Network      │ │   Animation     │   │
│  │    Observer     │ │   Interceptor   │ │    Tracker      │   │
│  │                 │ │                 │ │                 │   │
│  │ Watches DOM     │ │ Tracks XHR &    │ │ Monitors CSS &  │   │
│  │ changes via     │ │ Fetch pending   │ │ JS animations   │   │
│  │ MutationObserver│ │ requests        │ │                 │   │
│  └─────────────────┘ └─────────────────┘ └─────────────────┘   │
│                              │                                   │
│                              ▼                                   │
│                    STABILITY ORACLE                              │
│         "Is everything settled? Yes → Proceed"                  │
└─────────────────────────────────────────────────────────────────┘
Installation and Basic Usage
pip install waitless
from selenium import webdriver
from waitless import stabilize

# Wrap your driver once at the start
driver = stabilize(webdriver.Chrome())

# All subsequent commands automatically wait for stability
driver.get("https://app.example.com")
driver.find_element(By.ID, "dynamic-button").click()  # Stable!
driver.find_element(By.ID, "ajax-loaded-element").send_keys("text")  # Stable!
That's it. No explicit waits. No sleep statements. The driver automatically waits for stability before every action. New in v0.3.0+: Waitless now natively supports Shadow DOM, ensuring stability even within encapsulated web components without extra configuration.
🔍 Deep Dive: How Each Component Works
Component 1: DOM Mutation Observer
The MutationObserver API watches for changes to the DOM tree:
// Injected by Waitless into the browser
(function() {
    window.__waitless_last_mutation = Date.now();
    window.__waitless_mutation_count = 0;

    const observer = new MutationObserver((mutations) => {
        window.__waitless_mutation_count += mutations.length;
        window.__waitless_last_mutation = Date.now();
    });

    observer.observe(document.body, {
        childList: true,    // Watch for added/removed elements
        subtree: true,      // Watch entire DOM tree
        attributes: true,   // Watch attribute changes
        characterData: true // Watch text content changes
    });
})();
Stability Criteria: No mutations for 100ms (configurable).
Why 100ms? React, Vue, and Angular typically batch multiple DOM updates within a single animation frame (16ms). The 100ms buffer ensures all related updates have completed.
Component 2: Network Interceptor
Waitless intercepts XMLHttpRequest and fetch to track pending requests:
// XMLHttpRequest interception
(function() {
    window.__waitless_pending_requests = 0;

    const originalXHROpen = XMLHttpRequest.prototype.open;
    const originalXHRSend = XMLHttpRequest.prototype.send;

    XMLHttpRequest.prototype.open = function(...args) {
        this.__waitless_url = args[1];
        return originalXHROpen.apply(this, args);
    };

    XMLHttpRequest.prototype.send = function(...args) {
        window.__waitless_pending_requests++;

        this.addEventListener('loadend', () => {
            window.__waitless_pending_requests--;
        });

        return originalXHRSend.apply(this, args);
    };

    // Fetch interception
    const originalFetch = window.fetch;
    window.fetch = function(...args) {
        window.__waitless_pending_requests++;

        return originalFetch.apply(this, args)
            .finally(() => {
                window.__waitless_pending_requests--;
            });
    };
})();
Stability Criteria: Zero pending requests.
Component 3: Animation Tracker
Tracks CSS animations and JavaScript animations:
(function() {
    window.__waitless_active_animations = 0;

    // CSS Animation tracking
    document.addEventListener('animationstart', () => {
        window.__waitless_active_animations++;
    });

    document.addEventListener('animationend', () => {
        window.__waitless_active_animations--;
    });

    document.addEventListener('transitionstart', () => {
        window.__waitless_active_animations++;
    });

    document.addEventListener('transitionend', () => {
        window.__waitless_active_animations--;
    });
})();

// Web Animations API check
const getActiveAnimations = () => {
    return document.getAnimations().filter(a =>
        a.playState === 'running'
    ).length;
};
Stability Criteria: Zero running animations.
Configuration Options
from waitless import stabilize, StabilityConfig

config = StabilityConfig(
    # Timing controls
    mutation_settle_time=100,      # ms to wait after last DOM change
    network_idle_time=50,          # ms to wait after last network request
    animation_settle_time=50,      # ms to wait after last animation

    # Safety limits
    max_wait_time=30000,           # maximum wait time in ms
    poll_interval=50,              # how often to check stability

    # URL filtering (ignore analytics, monitoring, etc.)
    ignore_urls=[
        r".*google-analytics.*",
        r".*googletagmanager.*",
        r".*hotjar.*",
        r".*sentry.*",
        r".*datadog.*"
    ]
)

driver = stabilize(webdriver.Chrome(), config=config)
When to Adjust Configuration
| Scenario | Adjustment |
|---|---|
| Very slow API responses | Increase max_wait_time |
| Complex animations | Increase animation_settle_time |
| Analytics causing false positives | Add URLs to ignore_urls |
| Need faster feedback | Decrease poll_interval (use cautiously) |
Debugging Stability Issues
When a test still fails, Waitless provides diagnostic information:
from waitless import get_diagnostics

# After a test failure, check what was unstable
diagnostics = get_diagnostics(driver)

print(f"Pending network requests: {diagnostics['pending_requests']}")
print(f"Last mutation age: {diagnostics['ms_since_last_mutation']}ms")
print(f"Active animations: {diagnostics['active_animations']}")
print(f"Blocking URLs: {diagnostics['blocking_urls']}")
Example output for a failing test:
Pending network requests: 2
Last mutation age: 15ms
Active animations: 0
Blocking URLs: ['/api/user/profile', '/api/notifications']
This tells you the page wasn't stable because two API calls were still pending.
Illustrative impact: what to measure
Use the following figures as illustrative examples, not independently verified benchmarks. Record your baseline, workload, versions, and repeat runs before attributing a gain to a tool.
Before Waitless:
Test Suite: checkout_flow (5 tests)
├── test_add_to_cart        PASSED
├── test_update_quantity    FAILED (StaleElementReference)
├── test_apply_coupon       PASSED
├── test_checkout           FAILED (ElementNotInteractable)
└── test_payment            PASSED

Run 1: 60% pass rate
Run 2: 80% pass rate
Run 3: 40% pass rate
Average: 60% (Expected: 100%)
Re-runs required: 3-4 per CI pipeline
After Waitless:
Test Suite: checkout_flow (5 tests)
├── test_add_to_cart        PASSED
├── test_update_quantity    PASSED
├── test_apply_coupon       PASSED
├── test_checkout           PASSED
└── test_payment            PASSED

Run 1-100: 100% pass rate
Flaky failures eliminated: 100%
Re-runs required: 0
⚠️ Common Pitfalls
Pitfall 1: Long-Polling / WebSockets
If your app uses long-polling or maintains open WebSocket connections, Waitless may wait indefinitely for "network idle."
Solution:
config = StabilityConfig(
    ignore_urls=[
        r".*socket.*",
        r".*poll.*",
        r".*long-poll.*"
    ]
)
Pitfall 2: Infinite Animations
Loading spinners and animated backgrounds never "complete."
Solution:
# Waitless ignores animations on elements with these classes
config = StabilityConfig(
    ignore_animation_selectors=[
        ".loading-spinner",
        ".animated-background",
        "[data-infinite-animation]"
    ]
)
Pitfall 3: Analytics Calls
Google Analytics, Hotjar, and other analytics tools make constant requests.
Solution:
config = StabilityConfig(
    ignore_urls=[
        r".*google-analytics.*",
        r".*googletagmanager.*",
        r".*hotjar.*",
        r".*segment.*"
    ]
)
🔧 Hands-On Exercise: Implementing Custom Stability Check
Create a test that demonstrates Waitless in action:
from selenium import webdriver
from selenium.webdriver.common.by import By
from waitless import stabilize, StabilityConfig, get_diagnostics
import time

# Setup with custom config
config = StabilityConfig(
    mutation_settle_time=200,  # Extra buffer for this exercise
    max_wait_time=10000
)

driver = stabilize(webdriver.Chrome(), config=config)

try:
    # Test 1: Dynamic content loading
    driver.get("https://jsonplaceholder.typicode.com/")

    # By the time this line runs, the page is guaranteed stable
    title = driver.find_element(By.TAG_NAME, "h1").text
    print(f"✓ Page loaded. Title: {title}")

    # Check what Waitless detected
    diagnostics = get_diagnostics(driver)
    print(f"  Stability achieved in {diagnostics['total_wait_time']}ms")

    # Test 2: Navigating to a different page
    driver.get("https://httpbin.org/html")
    content = driver.find_element(By.TAG_NAME, "p").text[:50]
    print(f"✓ Second page loaded. Content preview: {content}...")

    print("\n✅ All tests passed with automatic stability detection!")

finally:
    driver.quit()
📋 Chapter 3 Summary
| Feature | Benefit |
|---|---|
| Automatic stability detection | No manual waits needed |
| DOM mutation tracking | Catches React/Vue re-renders |
| Network request tracking | Waits for AJAX to complete |
| Animation awareness | Prevents mid-animation clicks |
| Zero code changes | Works with existing tests |
| Configurable thresholds | Tune for your app's behavior |
Key Takeaway: Waitless shifts the waiting logic from your tests to the browser itself. Instead of guessing when to wait, it observes actual browser activity and proceeds only when truly stable.
Coming up next: Now that we've eliminated flakiness in functional tests, let's tackle visual testing—because a button working isn't the same as a button looking right.
PART II: VISUAL TESTING
Catching What Functional Tests Miss
"A user doesn't interact with the DOM—they interact with pixels. Test accordingly."
Chapter 4: Visual Guard - Comprehensive Visual Regression Testing
Why Visual Testing Matters
Functional tests verify that buttons click and forms submit. They don't verify that: - The button is visible and properly styled - Text is readable (not white on white) - Layout hasn't shifted unexpectedly - Mobile responsive design still works - CSS didn't accidentally hide critical elements
A user sees pixels, not DOM elements. Visual testing validates what users actually experience.
The Real-World Cost of Missed Visual Bugs
| Bug Type | Functional Test Result | User Experience |
|---|---|---|
| Button moved 200px left | ✅ PASS (still clickable) | "Where's the buy button?" |
| Text color matches background | ✅ PASS (text exists in DOM) | "I can't read anything!" |
| Modal renders behind overlay | ✅ PASS (elements exist) | "The site is frozen!" |
| Font failed to load | ✅ PASS (text displays) | "This looks unprofessional" |
| Mobile layout broken | ✅ PASS (desktop tested) | 50% of users can't use site |
The Limitation of Pixel-Perfect Comparison
Traditional visual testing compares screenshots pixel-by-pixel:
# Naive approach
from PIL import ImageChops

def compare_images(baseline, current):
    diff = ImageChops.difference(baseline, current)
    return diff.getbbox() is None  # True if identical
Problems with this approach: - Anti-aliasing differences across browsers/OS - Sub-pixel rendering variations - Font smoothing differences (Mac vs Windows) - System clock visible in screenshots - Dynamic content (usernames, timestamps) - Result: Constant false positives
💡 Key Insight: Identical Pixels ≠ Same Visual Experience
Two images can be: - Pixel-different but visually identical (anti-aliasing variations) - Pixel-similar but visually different (subtle color shift across entire page)
We need algorithms that match human perception, not bit comparison.
Visual Guard's Intelligent Approach
Visual Guard uses perceptual comparison algorithms that mimic how humans see:
Algorithm 1: SSIM (Structural Similarity Index)
SSIM doesn't compare pixels—it compares the structure of images:
SSIM analyzes three components:
1. Luminance (l) - Overall brightness comparison
2. Contrast (c) - Variation in brightness
3. Structure (s) - Patterns and edges

Final Score = l^α × c^β × s^γ
Where α, β, γ are weights (typically all 1)
🔍 Deep Dive: How SSIM Works
┌─────────────────────────────────────────────────────────────────┐
│                    SSIM COMPARISON PROCESS                       │
├─────────────────────────────────────────────────────────────────┤
│                                                                  │
│  BASELINE IMAGE              CURRENT IMAGE                       │
│  ┌─────────────────┐         ┌─────────────────┐                │
│  │ ░░░░░░░░░░░░░░ │         │ ░░░░░░░░░░░░░░ │                │
│  │ ░░▓▓▓▓▓▓▓▓░░░░ │         │ ░░▓▓▓▓▓▓▓▓░░░░ │                │
│  │ ░░▓▓▓▓▓▓▓▓░░░░ │         │ ░░▓▓▓▓▓▓▓▓░░░░ │                │
│  │ ░░░░░░░░░░░░░░ │         │ ░░░░░░░░░░░░░░ │                │
│  └─────────────────┘         └─────────────────┘                │
│           │                          │                          │
│           └──────────┬───────────────┘                          │
│                      ▼                                          │
│         ┌─────────────────────┐                                 │
│         │  For each window:   │                                 │
│         │  • Mean (μ)         │                                 │
│         │  • Variance (σ²)    │                                 │
│         │  • Covariance (σxy) │                                 │
│         └─────────────────────┘                                 │
│                      │                                          │
│                      ▼                                          │
│         ┌─────────────────────┐                                 │
│         │  Calculate SSIM:    │                                 │
│         │  (2μxμy + C1)(2σxy + C2)                              │
│         │  ─────────────────────────                            │
│         │  (μx² + μy² + C1)(σx² + σy² + C2)                     │
│         └─────────────────────┘                                 │
│                      │                                          │
│                      ▼                                          │
│              SSIM Score: 0.97                                   │
│              (1.0 = identical, 0.0 = completely different)      │
│                                                                  │
└─────────────────────────────────────────────────────────────────┘
Why SSIM is better for visual testing: - Ignores minor anti-aliasing differences (structure preserved) - Detects layout shifts (structure changed) - Handles slight color variations gracefully - Matches human perception of "same" vs "different"
Algorithm 2: Perceptual Hashing (pHash)
pHash creates a "fingerprint" of the image that's resistant to minor changes:
# How pHash works conceptually
def perceptual_hash(image):
    # 1. Resize to small square (32x32)
    small = resize(image, 32, 32)

    # 2. Convert to grayscale
    gray = grayscale(small)

    # 3. Apply Discrete Cosine Transform (DCT)
    dct = discrete_cosine_transform(gray)

    # 4. Keep only low-frequency components (top-left 8x8)
    low_freq = dct[:8, :8]

    # 5. Compute average (excluding DC component)
    avg = average(low_freq[1:])

    # 6. Create hash: 1 if above average, 0 if below
    hash = "".join("1" if v > avg else "0" for v in low_freq.flat)

    return hash  # 64-bit string like "1010110010..."
Comparing with pHash:
# Hamming distance = number of different bits
hash1 = "10101100..."  # Baseline
hash2 = "10101110..."  # Current (only 1 bit different)

hamming_distance = 1  # Very similar!

# Threshold: distance < 10 means same image
Using Visual Guard
Installation
pip install visual-guard
Basic Usage
from selenium import webdriver
from visualguard import VisualGuard

driver = webdriver.Chrome()
driver.get("https://example.com")

# Initialize Visual Guard
guard = VisualGuard(
    baseline_dir="./baselines",
    comparison_method="ssim",
    threshold=0.95  # 95% similarity required to pass
)

# Capture current state
guard.capture("homepage", driver)

# Compare against baseline (creates baseline if first run)
result = guard.compare("homepage")

if not result.passed:
    print(f"Visual regression detected!")
    print(f"Similarity score: {result.similarity:.2%}")
    print(f"Difference regions: {result.diff_regions}")
    result.save_diff_image("./reports/homepage_diff.png")
else:
    print(f"Visual check passed! Similarity: {result.similarity:.2%}")

driver.quit()
Handling Dynamic Content
Real applications have dynamic content: timestamps, usernames, advertisements. Visual Guard provides region masking:
from visualguard import VisualGuard, MaskRegion

guard = VisualGuard(baseline_dir="./baselines")

# Define regions to ignore during comparison
masks = [
    # By coordinates (x, y, width, height)
    MaskRegion(name="header_time", x=800, y=10, width=150, height=30),

    # By CSS selector (element found and masked automatically)
    MaskRegion(name="user_avatar", selector="#user-avatar"),
    MaskRegion(name="ad_banner", selector=".advertisement"),
    MaskRegion(name="timestamp", selector="[data-testid='timestamp']"),
]

result = guard.compare("dashboard", masks=masks)
Dynamic Mask Discovery
Don't know what's dynamic? Let Visual Guard figure it out:
from visualguard import discover_dynamic_regions

# Load the same page 3 times, detect what changes
dynamic_regions = discover_dynamic_regions(
    driver,
    url="https://app.example.com/dashboard",
    runs=3,
    interval_seconds=2
)

print(f"Detected {len(dynamic_regions)} dynamic regions:")
for region in dynamic_regions:
    print(f"  {region.selector}: changes {region.change_frequency}% of the time")

# Output:
# Detected 3 dynamic regions:
#   #notification-count: changes 100% of the time
#   .timestamp: changes 100% of the time
#   .chart-tooltip: changes 67% of the time
Multi-Browser and Responsive Testing
Cross-Browser Visual Tests
from visualguard import VisualGuard, BrowserConfig

# Define all browser/viewport combinations to test
configurations = [
    # Desktop browsers
    BrowserConfig(browser="chrome", width=1920, height=1080),
    BrowserConfig(browser="firefox", width=1920, height=1080),
    BrowserConfig(browser="edge", width=1920, height=1080),

    # Mobile viewports (using Chrome)
    BrowserConfig(browser="chrome", width=375, height=812, device="iPhone 12"),
    BrowserConfig(browser="chrome", width=414, height=896, device="iPhone 11"),
    BrowserConfig(browser="chrome", width=768, height=1024, device="iPad"),
]

guard = VisualGuard(baseline_dir="./baselines/multi-browser")

for config in configurations:
    driver = create_driver_for_config(config)
    driver.get("https://example.com")

    # Each config gets its own baseline
    capture_name = f"homepage_{config.browser}_{config.width}x{config.height}"
    guard.capture(capture_name, driver)
    result = guard.compare(capture_name)

    print(f"{capture_name}: {'PASS' if result.passed else 'FAIL'}")
    driver.quit()
Full-Page Screenshots
For pages with scroll:
from visualguard import VisualGuard, FullPageMode

guard = VisualGuard(
    baseline_dir="./baselines",
    full_page_mode=FullPageMode.SCROLL_STITCH  # Scroll and stitch screenshots
)

# Captures entire page, not just viewport
guard.capture("long_page", driver)
HTML Report Generation
from visualguard import generate_report

# After running all visual tests
generate_report(
    results_dir="./visual_results",
    output_file="./reports/visual_regression.html",
    include_thumbnails=True,
    side_by_side=True,
    diff_highlighting=True
)
The report includes: - Thumbnail grid of all comparisons - Side-by-side baseline vs. current - Difference highlighting overlay (pink/red shows changes) - Filtering by status (passed/failed) - One-click baseline update for intentional changes
🔧 Hands-On Exercise: Visual Testing Workflow
"""
Complete visual testing workflow example.
Creates baselines on first run, compares on subsequent runs.
"""
from selenium import webdriver
from visualguard import VisualGuard, MaskRegion
import os

def run_visual_tests():
    driver = webdriver.Chrome()
    guard = VisualGuard(baseline_dir="./baselines", threshold=0.95)

    test_cases = [
        {
            "name": "google_homepage",
            "url": "https://www.google.com",
            "masks": [
                MaskRegion(name="doodle", selector=".lnXdpd"),  # Google Doodle changes
            ]
        },
        {
            "name": "example_domain",
            "url": "https://example.com",
            "masks": []
        }
    ]

    results = []

    for test in test_cases:
        driver.get(test["url"])

        # Wait for page to stabilize
        import time
        time.sleep(2)

        # Capture
        guard.capture(test["name"], driver)

        # Compare
        result = guard.compare(test["name"], masks=test["masks"])
        results.append({
            "name": test["name"],
            "passed": result.passed,
            "similarity": result.similarity
        })

        # Save diff image if failed
        if not result.passed:
            os.makedirs("./diffs", exist_ok=True)
            result.save_diff_image(f"./diffs/{test['name']}_diff.png")

    driver.quit()

    # Print summary
    print("\n" + "="*50)
    print("VISUAL TEST RESULTS")
    print("="*50)
    for r in results:
        status = "✅ PASS" if r["passed"] else "❌ FAIL"
        print(f"{status} | {r['name']} | Similarity: {r['similarity']:.2%}")

    passed = sum(1 for r in results if r["passed"])
    print(f"\nTotal: {passed}/{len(results)} passed")

if __name__ == "__main__":
    run_visual_tests()
📋 Chapter 4 Summary
| Concept | Key Takeaway |
|---|---|
| Functional vs Visual | Functional tests miss layout/style bugs |
| Pixel comparison | Too brittle, constant false positives |
| SSIM | Compares structure, matches human perception |
| pHash | Creates fingerprint, tolerates minor changes |
| Region masking | Handle dynamic content areas |
| Multi-browser | Test across browsers and viewports |
PART III: AUTHENTICATION OPTIMIZATION
The Fastest Login Is No Login At All
"Every second spent logging in is a second not spent testing."
Chapter 5: The Hidden Cost of Authentication
The 40% Tax on Test Execution
Authentication in enterprise applications typically involves: 1. Loading the login page 2. Entering credentials 3. Submitting the form 4. Waiting for MFA/2FA (if applicable) 5. Handling redirects 6. Waiting for dashboard to load
Average time: 8-15 seconds per login.
For a test suite with 500 tests, each starting with a fresh login: - 500 tests × 10 seconds = 83 minutes just on authentication - That's 23% of a 6-hour test run spent logging in
The Deeper Problem: Test Isolation Requirements
Best practices dictate that tests should be isolated. Each test should: - Start from a known state - Not depend on previous tests - Clean up after itself
This usually means: fresh browser session per test = login per test.
Understanding Browser Authentication State
Before we can skip login, we need to understand what "being logged in" means at a technical level.
🔍 Deep Dive: What Happens When You Log In
┌─────────────────────────────────────────────────────────────────┐
│                    LOGIN PROCESS BREAKDOWN                       │
├─────────────────────────────────────────────────────────────────┤
│                                                                  │
│ 1. USER SUBMITS CREDENTIALS                                     │
│    POST /auth/login                                              │
│    Body: { username: "user@example.com", password: "***" }      │
│                                                                  │
│ 2. SERVER VALIDATES & GENERATES SESSION                         │
│    • Checks credentials against database                         │
│    • Creates session record (server-side)                       │
│    • Generates tokens (JWT, session ID, etc.)                   │
│                                                                  │
│ 3. SERVER SENDS AUTHENTICATION DATA TO BROWSER                  │
│    Set-Cookie: session_id=abc123; HttpOnly; Secure              │
│    Set-Cookie: csrf_token=xyz789; SameSite=Strict               │
│    Response: { access_token: "eyJ...", user: {...} }            │
│                                                                  │
│ 4. BROWSER STORES AUTHENTICATION DATA                           │
│    ┌─────────────────────────────────────────────────────┐      │
│    │ COOKIES        │ SESSION STORAGE │ LOCAL STORAGE    │      │
│    │ session_id     │ temp_data       │ user_settings    │      │
│    │ csrf_token     │ form_state      │ access_token     │      │
│    │ remember_me    │                 │ refresh_token    │      │
│    │ preferences    │                 │ user_profile     │      │
│    └─────────────────────────────────────────────────────┘      │
│                                                                  │
│ 5. SUBSEQUENT REQUESTS INCLUDE AUTH DATA                        │
│    Cookie: session_id=abc123; csrf_token=xyz789                 │
│    Authorization: Bearer eyJ...                                  │
│                                                                  │
└─────────────────────────────────────────────────────────────────┘
The Four Types of Browser State
| Storage Type | Persists After Close? | Accessible By | Size Limit |
|---|---|---|---|
| Cookies | Depends on Expires |
Server + JavaScript | ~4KB per cookie |
| LocalStorage | Yes | JavaScript only | ~5MB |
| SessionStorage | No (tab-scoped) | JavaScript only | ~5MB |
| IndexedDB | Yes | JavaScript only | Varies (large) |
Key Insight: Different apps store auth tokens in different places. Some use cookies, some use localStorage, some use both.
Traditional Approaches and Their Limits
Approach 1: Shared Session (Anti-Pattern)
# DON'T DO THIS
@pytest.fixture(scope="session")
def authenticated_driver():
    driver = webdriver.Chrome()
    login(driver)
    yield driver
    driver.quit()
Problems: - Tests aren't isolated - One test's actions affect subsequent tests - Cookie expiration causes cascading failures - State pollution is hard to debug
Approach 2: API Token Injection
def fast_login(driver, username, password):
    # Get auth token via API (bypasses UI)
    response = requests.post(
        "https://api.example.com/auth/login",
        json={"username": username, "password": password}
    )
    token = response.json()["token"]

    # Navigate first (required for cookie domain)
    driver.get("https://app.example.com")

    # Set cookie
    driver.add_cookie({
        "name": "auth_token",
        "value": token,
        "domain": "app.example.com"
    })

    driver.refresh()
Improvements: - Much faster than UI login - Bypasses MFA in some cases
Remaining Problems: - Only works if API endpoint exists and is accessible - Single cookie may not be enough (CSRF tokens, etc.) - LocalStorage/SessionStorage not populated - Application-specific initialization not triggered
Chapter 6: Selenium Teleport - Complete Browser State Restoration
The Teleportation Pattern
Selenium Teleport captures the complete browser state after a successful login and restores it instantly in future sessions.
What Gets Captured
{
    "captured_at": "2024-06-15T10:30:00Z",
    "url": "https://app.example.com/dashboard",

    "cookies": [
        {"name": "session_id", "value": "abc123", "domain": ".example.com", ...},
        {"name": "csrf_token", "value": "xyz789", "domain": "app.example.com", ...},
        {"name": "_ga", "value": "GA1.2...", "domain": ".example.com", ...}
    ],

    "local_storage": {
        "user_profile": "{\"id\": 123, \"name\": \"Test User\"}",
        "access_token": "eyJhbGciOiJIUzI1NiIsInR5cCI6IkpXVCJ9...",
        "app_settings": "{\"theme\": \"dark\", \"notifications\": true}"
    },

    "session_storage": {
        "current_page_state": "{\"tab\": \"dashboard\", \"filters\": []}",
        "form_draft": null
    }
}
Installation and Setup
pip install selenium-teleport
State Capture Workflow
from selenium import webdriver
from selenium_teleport import BrowserState

# Step 1: Perform login (one-time setup)
driver = webdriver.Chrome()
driver.get("https://app.example.com/login")

# Option A: Manual login
input("Log in manually, then press Enter...")

# Option B: Automated login
driver.find_element(By.ID, "email").send_keys("user@example.com")
driver.find_element(By.ID, "password").send_keys("secure_password")
driver.find_element(By.ID, "login-btn").click()

# Wait for complete authentication
WebDriverWait(driver, 30).until(
    EC.presence_of_element_located((By.ID, "dashboard"))
)

# Step 2: Capture the authenticated state
state = BrowserState.capture(driver)

# Step 3: Save to file for reuse
state.save("./states/admin_user.json")

print(f"✓ Captured {len(state.cookies)} cookies")
print(f"✓ Captured {len(state.local_storage)} localStorage items")
print(f"✓ Captured {len(state.session_storage)} sessionStorage items")

driver.quit()
State Restoration in Tests
from selenium import webdriver
from selenium_teleport import BrowserState

@pytest.fixture
def authenticated_driver():
    driver = webdriver.Chrome()

    # CRITICAL: Navigate to the domain first
    # Browsers enforce Same-Origin Policy for cookies
    driver.get("https://app.example.com")

    # Restore the captured state
    state = BrowserState.load("./states/admin_user.json")
    state.restore(driver)

    # Refresh to apply state
    driver.refresh()

    yield driver
    driver.quit()

def test_dashboard_loads(authenticated_driver):
    # Already logged in! No login steps needed
    assert "Dashboard" in authenticated_driver.title

def test_user_can_view_settings(authenticated_driver):
    authenticated_driver.get("https://app.example.com/settings")
    assert authenticated_driver.find_element(By.ID, "settings-form").is_displayed()
🔍 Deep Dive: Handling Same-Origin Policy
Browsers prevent setting cookies for domains you haven't visited. This is a security feature called the Same-Origin Policy.
The Problem:
driver = webdriver.Chrome()
# Current URL is about:blank

driver.add_cookie({"name": "token", "value": "abc", "domain": "app.example.com"})
# Silently fails! No error, but cookie isn't set
Selenium Teleport's Solution:
def restore(self, driver):
    # Group cookies by domain
    domains = set(c["domain"] for c in self.cookies)

    for domain in domains:
        # Navigate to each domain first
        clean_domain = domain.lstrip(".")
        driver.get(f"https://{clean_domain}")

        # Now cookies for this domain can be set
        domain_cookies = [c for c in self.cookies if c["domain"] == domain]
        for cookie in domain_cookies:
            try:
                # Remove unsupported keys that Selenium doesn't accept
                safe_cookie = {k: v for k, v in cookie.items()
                               if k in ["name", "value", "domain", "path",
                                        "secure", "httpOnly", "expiry", "sameSite"]}
                driver.add_cookie(safe_cookie)
            except Exception as e:
                logging.warning(f"Failed to set cookie {cookie['name']}: {e}")
Multi-User State Management
For tests that need different user roles:
from selenium_teleport import StateManager

# Setup: Capture states for different user roles
manager = StateManager(states_dir="./states")

# (Run once for each user type)
# manager.capture("admin_user", driver)
# manager.capture("standard_user", driver)
# manager.capture("readonly_user", driver)

# In tests: Parameterized fixture
@pytest.fixture(params=["admin_user", "standard_user"])
def user_driver(request):
    driver = webdriver.Chrome()
    driver.get("https://app.example.com")

    manager = StateManager(states_dir="./states")
    manager.restore(request.param, driver)
    driver.refresh()

    yield driver, request.param
    driver.quit()

def test_permission_based_access(user_driver):
    driver, user_type = user_driver

    # Navigate to admin page
    driver.get("https://app.example.com/admin")

    if user_type == "admin_user":
        assert driver.find_element(By.ID, "admin-panel").is_displayed()
    else:
        # Standard users should see "Access Denied"
        assert "Access Denied" in driver.page_source
State Freshness and Expiration
States don't last forever—sessions expire, tokens become invalid.
from selenium_teleport import BrowserState
from datetime import datetime, timedelta

state = BrowserState.load("./states/admin_user.json")

# Check if state is stale
if state.captured_at < datetime.now() - timedelta(hours=24):
    print("⚠️ State is more than 24 hours old - may need refresh")

# Check for expired cookies
expired = [
    c["name"] for c in state.cookies
    if c.get("expiry") and c["expiry"] < datetime.now().timestamp()
]
if expired:
    print(f"⚠️ These cookies have expired: {expired}")

# Automatic freshness check during restore
try:
    state.restore(driver, strict=True)  # Raises if any cookie expired
except StateExpiredError as e:
    print(f"State invalid: {e}")
    # Re-authenticate and capture new state
CI/CD Integration: Auto-Refresh Pattern
# .github/workflows/refresh-states.yml
name: Refresh Auth States

on:
  schedule:
    - cron: '0 */6 * * *'  # Every 6 hours
  workflow_dispatch:  # Manual trigger

jobs:
  refresh:
    runs-on: ubuntu-latest
    steps:
      - uses: actions/checkout@v4

      - name: Refresh admin state
        run: python scripts/refresh_states.py

      - name: Upload new states
        uses: actions/upload-artifact@v4
        with:
          name: auth-states
          path: states/
Performance Impact
| Scenario | Time Per Test | For 500 Tests |
|---|---|---|
| Full UI Login | 10-15s | 83+ minutes |
| API Token + Cookie | 3-5s | 25-40 minutes |
| Selenium Teleport | 0.5-1s | 4-8 minutes |
Total time saved per CI run: 75+ minutes
For a team running CI 10 times/day: 750 minutes (12.5 hours) saved daily
⚠️ Common Pitfalls
Pitfall 1: HttpOnly Cookies
Cookies marked HttpOnly can't be read by JavaScript, but CAN be set via Selenium.
# This works even for HttpOnly cookies
driver.add_cookie({
    "name": "session",
    "value": "abc123",
    "httpOnly": True  # Selenium can still set this
})
Pitfall 2: Secure Cookies on HTTP
Secure cookies only work on HTTPS:
# ❌ WRONG: HTTP won't accept Secure cookies
driver.get("http://app.example.com")
driver.add_cookie({"name": "token", "secure": True})  # Silently fails

# ✅ CORRECT: Use HTTPS
driver.get("https://app.example.com")
driver.add_cookie({"name": "token", "secure": True})  # Works
Pitfall 3: SameSite Cookies
Modern browsers enforce SameSite attribute:
# SameSite=Strict cookies won't be sent on cross-site navigation
# Make sure you're on the correct domain when setting

driver.get("https://app.example.com")  # Navigate to same site
driver.add_cookie({
    "name": "csrf",
    "value": "token123",
    "sameSite": "Strict"
})
🔧 Hands-On Exercise: Complete Teleport Workflow
"""
Complete Selenium Teleport workflow.
Run this once to capture state, then use in tests.
"""
from selenium import webdriver
from selenium_teleport import BrowserState, StateManager
from selenium.webdriver.common.by import By
from selenium.webdriver.support.ui import WebDriverWait
from selenium.webdriver.support import expected_conditions as EC
import os

def capture_state_demo():
    """Demo: Capture state from Google (no login, just session)"""
    driver = webdriver.Chrome()
    driver.get("https://www.google.com")

    # Interact to generate some state
    search_box = driver.find_element(By.NAME, "q")
    search_box.send_keys("Selenium Teleport")
    search_box.submit()

    # Wait for results
    WebDriverWait(driver, 10).until(
        EC.presence_of_element_located((By.ID, "search"))
    )

    # Capture state
    state = BrowserState.capture(driver)

    # Save
    os.makedirs("./demo_states", exist_ok=True)
    state.save("./demo_states/google_session.json")

    print(f"✓ Captured state from URL: {driver.current_url}")
    print(f"  Cookies: {len(state.cookies)}")
    print(f"  LocalStorage items: {len(state.local_storage)}")

    driver.quit()
    return state

def restore_state_demo():
    """Demo: Restore the captured state"""
    driver = webdriver.Chrome()

    # Must navigate to domain first
    driver.get("https://www.google.com")

    # Load and restore state
    state = BrowserState.load("./demo_states/google_session.json")
    state.restore(driver)

    # Verify restoration
    cookies_count = len(driver.get_cookies())
    print(f"✓ Restored {cookies_count} cookies")

    driver.quit()

if __name__ == "__main__":
    print("Step 1: Capturing state...")
    capture_state_demo()

    print("\nStep 2: Restoring state...")
    restore_state_demo()

    print("\n✅ Teleport demo complete!")
📋 Chapters 5-6 Summary
| Concept | Key Takeaway |
|---|---|
| Auth Cost | Login can consume 20-40% of test execution time |
| Browser State | Auth stored in cookies, localStorage, sessionStorage |
| Same-Origin Policy | Must navigate to domain before setting cookies |
| Selenium Teleport | Capture and restore complete auth state |
| Multi-User | Manage different user role states for comprehensive testing |
| Freshness | States expire; automate refresh in CI |
PART IV: STEALTH & BOT EVASION

Testing Behind Modern Security
"When the website thinks you're a bot, you can't test anything."
Chapter 7: Understanding Modern Bot Detection
Why Your Tests Get Blocked
Modern bot detection has evolved far beyond simple CAPTCHAs. Services like Cloudflare, PerimeterX, DataDome, and Akamai use sophisticated fingerprinting that can detect standard Selenium in milliseconds.
The Detection Arsenal
┌─────────────────────────────────────────────────────────────────┐
│                   BOT DETECTION LAYERS                           │
├─────────────────────────────────────────────────────────────────┤
│                                                                  │
│  LAYER 1: BROWSER FINGERPRINT                                   │
│  Is this a real browser? Does it have all the expected APIs?    │
│  • navigator.webdriver flag                                      │
│  • WebGL renderer/vendor                                         │
│  • Canvas fingerprint                                            │
│  • Plugin list                                                   │
│  • Screen resolution consistency                                │
│                                                                  │
│  LAYER 2: BEHAVIORAL ANALYSIS                                   │
│  Does this user act human?                                      │
│  • Mouse movement patterns                                       │
│  • Keyboard timing                                               │
│  • Scroll behavior                                               │
│  • Time to first interaction                                    │
│                                                                  │
│  LAYER 3: NETWORK SIGNALS                                       │
│  Does the traffic look normal?                                  │
│  • IP reputation                                                 │
│  • TLS fingerprint (JA3)                                        │
│  • HTTP header order                                             │
│  • Request timing patterns                                       │
│                                                                  │
│  LAYER 4: CHALLENGE-RESPONSE                                    │
│  Can they solve puzzles?                                        │
│  • Invisible reCAPTCHA                                          │
│  • Cloudflare Turnstile                                         │
│  • Proof-of-work challenges                                     │
│                                                                  │
└─────────────────────────────────────────────────────────────────┘
🔍 Deep Dive: Browser Fingerprinting
Detection Vector 1: The WebDriver Flag
// What detection services check first
console.log(navigator.webdriver);  // true = Selenium!

// Standard Selenium Chrome sets this to true
// It's a W3C standard for automation detection
Why it exists: The WebDriver spec requires browsers to expose when they're being automated. This is a security feature, not a bug.
Detection Vector 2: WebGL Fingerprint
// Every GPU produces slightly different rendering
const canvas = document.createElement('canvas');
const gl = canvas.getContext('webgl');

const fingerprint = {
    vendor: gl.getParameter(gl.VENDOR),
    renderer: gl.getParameter(gl.RENDERER),
    extensions: gl.getSupportedExtensions()
};

// Real browser: "Intel Inc." / "Intel Iris OpenGL Engine"
// Headless: Often "Google SwiftShader" or empty
Detection Vector 3: Canvas Fingerprint
// Same canvas operations produce different pixels per system
const canvas = document.createElement('canvas');
const ctx = canvas.getContext('2d');

ctx.textBaseline = 'top';
ctx.font = '14px Arial';
ctx.fillText('fingerprint', 2, 2);

const hash = canvas.toDataURL().hashCode();
// Hash is unique per browser/OS/GPU combination
Detection Vector 4: Plugin Detection
// Real browsers have plugins
console.log(navigator.plugins.length);
// Real Chrome: 3-5 plugins (PDF Viewer, etc.)
// Headless: 0 plugins

// Plugin details also checked
for (let plugin of navigator.plugins) {
    console.log(plugin.name, plugin.filename);
}
Why Standard Selenium Fails
# Standard Selenium Chrome instance
driver = webdriver.Chrome()

# Detection services see:
# ✗ navigator.webdriver = true
# ✗ No WebGL or suspicious WebGL
# ✗ No plugins
# ✗ Suspicious browser automation flags in Chrome args
# ✗ Inhuman interaction speed (clicks happen instantly)
# ✗ No mouse movement between clicks

# Result: Blocked immediately
Detection Vector 5: Behavioral Analysis
Even if you fool the fingerprint checks, behavior gives you away:
Mouse Movement
// Real users have natural mouse paths
document.addEventListener('mousemove', e => {
    recordMovement(e.clientX, e.clientY, Date.now());
});

// Analysis:
// Human: Curved paths, acceleration/deceleration, micro-movements
// Bot: No movements, or perfect straight lines between clicks
Keyboard Timing
// Real users have variable typing speed
document.addEventListener('keydown', e => {
    recordKeyTiming(e.key, Date.now());
});

// Analysis:
// Human: Variable delays (50-300ms), some keys faster (home row)
// Bot: Perfect consistent timing, or all keys instant
Click Behavior
| Metric | Human | Bot |
|---|---|---|
| Time on page before first click | 2-10 seconds | < 500ms |
| Mouse movement before click | Curved path | None or straight |
| Click position | Slightly random | Exact center |
| Double-click frequency | Occasional | Never or always |
Chapter 8: SB Stealth Wrapper - Becoming Invisible
🔍 Deep Dive: The Stealth Architecture
SB Stealth Wrapper (StealthAutomation) builds on SeleniumBase to provide multi-layered stealth:
┌─────────────────────────────────────────────────────────────────┐
│                    STEALTH ARCHITECTURE                          │
├─────────────────────────────────────────────────────────────────┤
│                                                                  │
│  LAYER 1: ENVIRONMENT DETECTION                                 │
│  ┌─────────────────────────────────────────────────────────┐   │
│  │ • Detects CI vs Local development                        │   │
│  │ • Configures display (Xvfb on Linux headless)           │   │
│  │ • Sets appropriate headless mode                         │   │
│  │ • Handles Docker/container environments                  │   │
│  └─────────────────────────────────────────────────────────┘   │
│                                                                  │
│  LAYER 2: BROWSER FINGERPRINT SPOOFING                          │
│  ┌─────────────────────────────────────────────────────────┐   │
│  │ • Patches navigator.webdriver → undefined                │   │
│  │ • Injects consistent WebGL fingerprint                   │   │
│  │ • Adds realistic plugins list                            │   │
│  │ • Consistent user-agent across all signals               │   │
│  │ • Spoofs hardware concurrency and device memory          │   │
│  └─────────────────────────────────────────────────────────┘   │
│                                                                  │
│  LAYER 3: HUMAN-LIKE BEHAVIOR                                   │
│  ┌─────────────────────────────────────────────────────────┐   │
│  │ • Random micro-delays between actions                    │   │
│  │ • Simulated mouse movement paths                         │   │
│  │ • Realistic typing patterns with variable speed          │   │
│  │ • Random scroll behavior                                 │   │
│  └─────────────────────────────────────────────────────────┘   │
│                                                                  │
│  LAYER 4: NETWORK NORMALIZATION                                 │
│  ┌─────────────────────────────────────────────────────────┐   │
│  │ • Standard TLS configuration                             │   │
│  │ • Normal HTTP header ordering                            │   │
│  │ • Proxy rotation support                                 │   │
│  └─────────────────────────────────────────────────────────┘   │
│                                                                  │
└─────────────────────────────────────────────────────────────────┘
Installation
pip install stealthautomation
Basic Usage
from stealthautomation import StealthBrowser

# Automatic environment configuration
with StealthBrowser() as sb:
    # Navigate with human-like behavior
    sb.open("https://protected-site.com")

    # Interactions automatically include human patterns
    sb.type("#email", "user@example.com")    # Types with realistic timing
    sb.type("#password", "secret")
    sb.click("#login-button")                 # Includes mouse movement

    # Assertions work normally
    sb.assert_element("#dashboard")
Configuration Options
from stealthautomation import StealthBrowser, StealthConfig

config = StealthConfig(
    # Headless options
    headless=True,                    # True for CI, False for debugging
    headless_mode="new",              # Chrome's new headless (less detectable)

    # Display configuration (Linux CI)
    use_virtual_display=True,         # Use Xvfb
    display_width=1920,
    display_height=1080,

    # Fingerprint spoofing
    webgl_vendor="Intel Inc.",
    webgl_renderer="Intel Iris OpenGL Engine",
    user_agent="Mozilla/5.0 (Windows NT 10.0; Win64; x64)...",

    # Behavior configuration
    human_delay_min=0.1,              # Minimum delay between actions (seconds)
    human_delay_max=0.3,              # Maximum delay
    enable_mouse_movement=True,       # Simulate mouse paths
    typing_speed_variance=0.3,        # 30% variance in typing speed
)

with StealthBrowser(config=config) as sb:
    sb.open("https://protected-site.com")
Handling Specific Protections
Cloudflare Turnstile
from stealthautomation import StealthBrowser

with StealthBrowser() as sb:
    sb.open("https://site-with-cloudflare.com")

    # Stealth wrapper handles the challenge automatically
    # by appearing as a real browser

    # Wait for any challenge to complete
    sb.wait_for_element("#main-content", timeout=30)

    # Continue with normal testing
    sb.assert_text_visible("Welcome")
reCAPTCHA v3 (Invisible)
# reCAPTCHA v3 scores behavior, not puzzles
# Stealth mode increases score by acting human

with StealthBrowser() as sb:
    sb.open("https://site-with-recaptcha.com")

    # Spend time on page like a real user
    sb.scroll_down()
    time.sleep(2)
    sb.move_mouse_to_element("#some-section")

    # Now interact
    sb.click("#protected-button")
CI/CD Integration
GitHub Actions
name: Stealth Tests

on: [push, pull_request]

jobs:
  test:
    runs-on: ubuntu-latest

    steps:
      - uses: actions/checkout@v4

      - name: Set up Python
        uses: actions/setup-python@v5
        with:
          python-version: '3.11'

      - name: Install dependencies
        run: |
          pip install stealthautomation pytest

      - name: Install Chrome
        run: |
          wget -q https://dl.google.com/linux/direct/google-chrome-stable_current_amd64.deb
          sudo apt-get install ./google-chrome-stable_current_amd64.deb

      - name: Install Xvfb (virtual display)
        run: sudo apt-get install -y xvfb

      - name: Run tests
        run: |
          # Start virtual display
          Xvfb :99 -screen 0 1920x1080x24 &
          export DISPLAY=:99

          # Run tests
          pytest tests/ -v
Debugging Detection Issues
from stealthautomation import StealthBrowser, check_detection

with StealthBrowser() as sb:
    # Check what detection services might see
    detection_report = check_detection(sb)

    print("=== Detection Report ===")
    print(f"WebDriver flag visible: {detection_report['webdriver_visible']}")
    print(f"Plugins detected: {detection_report['plugins_count']}")
    print(f"WebGL available: {detection_report['webgl_available']}")
    print(f"Canvas fingerprint: {detection_report['canvas_hash'][:20]}...")

    # Test against known detection sites
    sb.open("https://bot.sannysoft.com")
    sb.save_screenshot("bot_test.png")

    sb.open("https://browserleaks.com/javascript")
    sb.save_screenshot("browserleaks_test.png")
⚠️ Ethical Considerations
Important: Stealth automation should only be used for: - ✅ Testing your own applications - ✅ Testing applications where you have explicit permission - ✅ QA environments with security controls similar to production
Not for: - ❌ Scraping data without permission - ❌ Bypassing rate limits on third-party services - ❌ Any malicious purposes
PART V: MODERN WEB ARCHITECTURES
Conquering Shadow DOM and Web Components
"The shadow boundary is a wall—but every wall has a door."
Chapter 9: Understanding Shadow DOM
What Is Shadow DOM and Why Does It Exist?
Shadow DOM is a web standard that enables encapsulation. It creates a separate DOM tree hidden from the main document:
<!-- Main Page (Light DOM) -->
<body>
    <h1>Welcome</h1>

    <!-- This is a custom element -->
    <custom-button id="my-button">
        <!-- Shadow boundary starts here -->
        #shadow-root (open)
            <style>
                /* These styles ONLY affect shadow content */
                button { background: blue; color: white; }
            </style>
            <button class="inner-btn">
                <slot></slot>  <!-- Content projection -->
            </button>
        <!-- Shadow boundary ends here -->

        Click Me  <!-- This text goes into the <slot> -->
    </custom-button>
</body>
Visual Representation
┌─────────────────────────────────────────────────────────────────┐
│                        DOCUMENT                                  │
│  ┌───────────────────────────────────────────────────────────┐  │
│  │                    LIGHT DOM                               │  │
│  │                                                            │  │
│  │  <body>                                                    │  │
│  │    <h1>Welcome</h1>                                        │  │
│  │    <custom-button id="my-button">                          │  │
│  │      ║                                                     │  │
│  │      ║ SHADOW BOUNDARY                                     │  │
│  │      ║ ┌─────────────────────────────────────────────┐    │  │
│  │      ║ │ #shadow-root                                 │    │  │
│  │      ║ │   <style>...</style>                         │    │  │
│  │      ║ │   <button class="inner-btn">                │    │  │
│  │      ║ │     <slot></slot>                           │    │  │
│  │      ║ │   </button>                                 │    │  │
│  │      ║ └─────────────────────────────────────────────┘    │  │
│  │      "Click Me" (slotted content)                          │  │
│  │    </custom-button>                                        │  │
│  │  </body>                                                   │  │
│  └───────────────────────────────────────────────────────────┘  │
└─────────────────────────────────────────────────────────────────┘
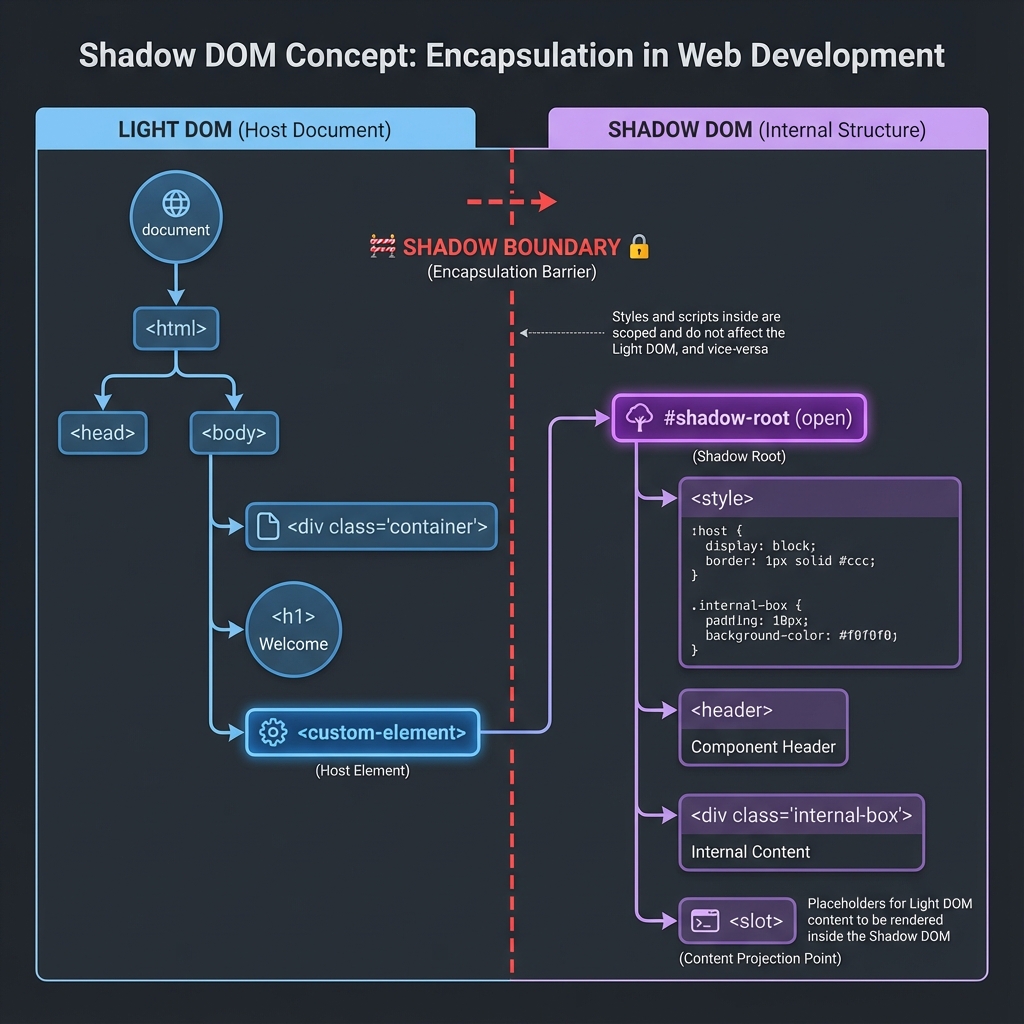
Why Frameworks Use Shadow DOM
1. Style Encapsulation
/* Without Shadow DOM: Styles leak everywhere */
.btn { background: red; }   /* Affects ALL .btn on page */

/* With Shadow DOM: Styles are scoped */
/* Inside shadow: */ .btn { background: blue; }
/* These don't affect each other! */
2. DOM Encapsulation
// Without Shadow DOM:
document.querySelector('.btn');  // Finds ANY .btn

// With Shadow DOM:
document.querySelector('.inner-btn');  // Returns null!
// Button is hidden inside shadow root
3. Clean Component APIs
The component's internal structure is an implementation detail. Users of the component only see:
<custom-button>Click Me</custom-button>
Not the internal <button>, <style>, or implementation details.
Frameworks That Use Shadow DOM
| Framework | Shadow DOM Usage | Difficulty for Testing |
|---|---|---|
| Salesforce Lightning (LWC) | Extensive, deeply nested | Very High |
| Angular Material | Optional per component | Medium |
| Ionic Framework | All components | High |
| Shoelace | All components | High |
| SAP UI5 (Web Components) | All components | High |
| Vaadin | All components | High |
| Adobe Spectrum | All components | High |
Why Standard Selenium Fails
# This element is inside a shadow root
driver.find_element(By.CSS_SELECTOR, "button.inner-btn")
# NoSuchElementException: Unable to locate element

# Even XPath fails
driver.find_element(By.XPATH, "//button[@class='inner-btn']")
# NoSuchElementException

# The shadow boundary is a HARD WALL
# querySelector() cannot cross it
🔍 Deep Dive: Why Standard Queries Fail
// This is what Selenium executes internally:
document.querySelector("button.inner-btn")  // Returns null

// The button exists, but it's in a separate DOM tree
// You must access the shadow root first:
const host = document.querySelector("custom-button");
const shadow = host.shadowRoot;
const button = shadow.querySelector("button.inner-btn");  // Found!
Chapter 10: Lumos ShadowDOM - Illuminating the Darkness
How Lumos Works
Lumos ShadowDOM extends Selenium WebDriver with shadow-aware methods by injecting JavaScript that traverses shadow boundaries.
Installation
pip install lumos-shadowdom
Basic Usage
from selenium import webdriver
from lumos_shadowdom import patch_driver

# Patch the driver with shadow DOM support
driver = patch_driver(webdriver.Chrome())

driver.get("https://app-with-shadow-dom.com")

# Find element inside shadow DOM
shadow_button = driver.find_shadow("custom-button", "button.inner-btn")
shadow_button.click()

# Find with multiple shadow boundaries
deep_element = driver.find_deep(
    "outer-component",    # Host element 1
    "inner-component",    # Host element 2 (inside first shadow)
    "button.submit"       # Target element (inside second shadow)
)
🔍 Deep Dive: How Shadow Traversal Works
// Lumos injects this JavaScript into the browser
function findInShadow(hostSelector, targetSelector) {
    // Step 1: Find the host element in light DOM
    const host = document.querySelector(hostSelector);
    if (!host) return null;

    // Step 2: Access its shadow root
    const shadowRoot = host.shadowRoot;
    if (!shadowRoot) {
        // Might be a closed shadow root - more complex handling needed
        return null;
    }

    // Step 3: Query inside the shadow root
    return shadowRoot.querySelector(targetSelector);
}

// For deeply nested shadows, recursive traversal:
function findDeep(...selectors) {
    let current = document;

    for (let i = 0; i < selectors.length - 1; i++) {
        current = current.querySelector(selectors[i]);
        if (!current) return null;
        current = current.shadowRoot;
        if (!current) return null;
    }

    // Last selector is the target element
    return current.querySelector(selectors[selectors.length - 1]);
}
🔍 Deep Dive: The Closed Shadow Root Challenge
Standard automation tools have zero access to "closed" shadow roots (shadowRoot returns
null).
To bypass this, Lumos uses a technique called Prototype Patching. Before the website's
components even load, Lumos injects a script that replaces Element.prototype.attachShadow
with a custom version that always sets mode: 'open', regardless of what the developer
intended. This "unlocks" the entire component tree for automation.
Multi-Level Shadow Traversal
Real-world example with Salesforce Lightning:
# Lightning Web Components are deeply nested
# Structure: page → record-form → input-field → input → actual <input>

# Deep nesting: light DOM → shadow → shadow → shadow → target
lightning_input = driver.find_deep(
    "lightning-record-form",           # Level 1: The form component
    "lightning-input-field",           # Level 2: Field wrapper
    "lightning-input",                 # Level 3: Input component
    "input[type='text']"               # Level 4: Actual input element
)

lightning_input.send_keys("Hello World")
Visualizing the Traversal
DOCUMENT
  └── lightning-record-form
        └── #shadow-root
              └── lightning-input-field[data-field="Name"]
                    └── #shadow-root
                          └── lightning-input
                                └── #shadow-root
                                      └── input[type="text"]  ← TARGET
Smart Text Search
When you don't know the structure, search by visible text:
# Find element by visible text, even inside shadows
submit_button = driver.find_shadow_text("Submit Order")

# Find with partial match
cancel_link = driver.find_shadow_text("Cancel", partial=True)

# Find input by its label (accessibility pattern)
email_input = driver.find_shadow_by_label("Email Address")
Selector Discovery Tool
When you're exploring an unfamiliar app:
from lumos_shadowdom import discover_selectors

# Analyze page and generate selectors for interactive elements
selectors = discover_selectors(
    driver,
    visual_label="Email Address",  # What the user sees
    element_type="input"           # What type of element
)

print(selectors)
# {
#     'selector': 'ui-input-field::shadow input[name="email"]',
#     'shadow_path': ['ui-form', 'ui-input-field'],
#     'confidence': 0.95,
#     'code': 'driver.find_deep("ui-form", "ui-input-field", "input[name=\\'email\\']")'
# }
Handling Mixed Light/Shadow DOM
Most real apps have both:
# Regular elements in light DOM
page_title = driver.find_element(By.TAG_NAME, "h1")  # Standard Selenium

# Form is in light DOM, but fields are shadow components
form = driver.find_element(By.ID, "contact-form")

# Fields inside shadow components
email_field = driver.find_shadow("custom-input[name='email']", "input")
phone_field = driver.find_shadow("custom-input[name='phone']", "input")

# Submit button might be in light DOM
submit = form.find_element(By.CSS_SELECTOR, "button[type='submit']")

# Or in shadow DOM
submit = driver.find_shadow("custom-button[type='submit']", "button")
PART VI: AI & INTELLIGENT AUTOMATION
Leveraging AI for Smarter Testing
Chapter 11: Selector Scout - AI-Generated Resilient Locators
The Selector Maintenance Problem
Selectors break constantly: - Developers change IDs during refactoring - Class names are generated by CSS-in-JS libraries - DOM structure changes without notice - Dynamic IDs change on every page load
Selector maintenance can consume substantial engineering time. Track locator-related failures in your own suite before choosing a replacement strategy.
🔍 Deep Dive: The Brittle Selector Spectrum
# ❌ MOST BRITTLE: Auto-generated IDs
driver.find_element(By.ID, "input_email_7x9k2")  # Changes each build

# ⚠️ SOMEWHAT BRITTLE: Generated class names
driver.find_element(By.CSS_SELECTOR, ".MuiInput-root-1234")  # Material-UI

# ✓ BETTER: data-testid (but requires dev cooperation)
driver.find_element(By.CSS_SELECTOR, "[data-testid='email-input']")

# ✓ MORE RESILIENT: Semantic attributes
driver.find_element(By.CSS_SELECTOR, "input[type='email'][name='email']")

# ✓ MOST RESILIENT: Semantic path with context
driver.find_element(By.XPATH, "//form[@aria-label='Login']//input[@type='email']")
Selector Scout's AI Approach
Selector Scout uses AI (Google Gemini) to analyze HTML and generate resilient selectors:
from selector_scout import SelectorScout

scout = SelectorScout(api_key="your-gemini-api-key")

# Paste raw HTML from DevTools
selectors = scout.analyze("""
<div class="form_7x92ka login-module">
    <div class="field_container_abc123">
        <label for="email-1234">Email Address</label>
        <input
            id="email-1234"
            type="email"
            data-testid="login-email"
            class="input_xyz789 form-control"
            placeholder="Enter your email"
        >
    </div>
</div>
""")

print(selectors)
# {
#     "primary": "[data-testid='login-email']",
#     "fallbacks": [
#         "input[type='email'][placeholder='Enter your email']",
#         "input[type='email']",
#         "#email-1234"
#     ],
#     "xpath": "//label[contains(text(),'Email')]/following-sibling::input",
#     "strategy_notes": "Primary uses data-testid (stable). Fallback 1 uses
#                        semantic attributes. Avoid ID as it appears auto-generated."
# }
Batch Analysis and Page Object Generation
from selector_scout import SelectorScout

scout = SelectorScout(api_key="your-api-key")

# Analyze entire page
page_selectors = scout.analyze_page(driver)

print(f"Found {len(page_selectors)} interactive elements")
for element in page_selectors:
    print(f"{element['label']}: {element['primary_selector']}")

# Auto-generate Page Object
scout.export_page_object(
    page_selectors,
    output_file="./pages/login_page.py",
    class_name="LoginPage"
)
Generated output:
# login_page.py (auto-generated by Selector Scout)
from selenium.webdriver.common.by import By

class LoginPage:
    # Selectors
    EMAIL_INPUT = (By.CSS_SELECTOR, "[data-testid='login-email']")
    PASSWORD_INPUT = (By.CSS_SELECTOR, "[data-testid='login-password']")
    SUBMIT_BUTTON = (By.CSS_SELECTOR, "button[type='submit']")
    FORGOT_PASSWORD_LINK = (By.XPATH, "//a[contains(text(),'Forgot')]")

    def __init__(self, driver):
        self.driver = driver

    def enter_email(self, email: str):
        self.driver.find_element(*self.EMAIL_INPUT).send_keys(email)

    def enter_password(self, password: str):
        self.driver.find_element(*self.PASSWORD_INPUT).send_keys(password)

    def click_submit(self):
        self.driver.find_element(*self.SUBMIT_BUTTON).click()

    def click_forgot_password(self):
        self.driver.find_element(*self.FORGOT_PASSWORD_LINK).click()
Chapter 12: Testing GenAI Chatbots with Selenium
The Unique Challenges of AI Interfaces
Testing GenAI chatbots breaks traditional automation patterns:
Challenge 1: Streaming Responses
Chatbots type responses token-by-token. There's no single moment where the response is "complete."
Timeline of a chatbot response:
  0ms:   ""
 100ms:  "The"
 200ms:  "The capital"
 300ms:  "The capital of"
 400ms:  "The capital of France"
 500ms:  "The capital of France is"
 600ms:  "The capital of France is Paris"
 700ms:  "The capital of France is Paris."

When do you assert? Any assertion before 700ms will catch incomplete text!
Challenge 2: Non-Deterministic Output
Same prompt yields different responses:
Prompt: "What's 2+2?"

Response 1: "2+2 equals 4."
Response 2: "The answer is 4."
Response 3: "Four."
Response 4: "2 plus 2 is 4!"
Response 5: "The sum of 2 and 2 is 4."

Traditional assertEquals fails even though all are correct!
Challenge 3: Variable Latency
- First token might take 500ms or 5000ms
- Total response time varies by length
- Server load affects response speed
Selenium Chatbot Test Library
pip install selenium-chatbot-test
Core Component 1: StreamWaiter
Detects when streaming has truly completed:
from selenium_chatbot_test import StreamWaiter

waiter = StreamWaiter(
    driver,
    response_selector="#chat-response",
    stability_threshold=500,  # ms of no changes = complete
    timeout=30000             # max wait time
)

# Send message
driver.find_element(By.ID, "chat-input").send_keys("What is Python?")
driver.find_element(By.ID, "send-button").click()

# Wait for streaming to complete
response_text = waiter.wait_for_completion()
print(f"Bot responded: {response_text}")
Core Component 2: SemanticAssert
Assert meaning, not exact text:
from selenium_chatbot_test import SemanticAssert

asserter = SemanticAssert(model="all-MiniLM-L6-v2")

# These all mean the same thing
response = "The capital city of France is Paris."

assert asserter.similar(
    response,
    "Paris is France's capital",
    threshold=0.75  # 75% semantic similarity required
)

# Check for concept presence
assert asserter.contains_concept(response, "Paris")
assert asserter.contains_concept(response, "capital")
Core Component 3: LatencyMonitor
Track performance metrics:
from selenium_chatbot_test import LatencyMonitor

monitor = LatencyMonitor(driver, response_selector="#chat-response")

driver.find_element(By.ID, "chat-input").send_keys("Hello!")
driver.find_element(By.ID, "send-button").click()

metrics = monitor.measure()

print(f"Time to First Token (TTFT): {metrics.ttft_ms}ms")
print(f"Tokens per second: {metrics.tokens_per_second}")
print(f"Total response time: {metrics.total_time_ms}ms")

# Performance assertions
assert metrics.ttft_ms < 2000, "First token too slow"
assert metrics.tokens_per_second > 20, "Streaming too slow"
Chapter 13: Pytest-MockLLM - Testing AI Features Without API Costs
The Problem with Testing LLM-Powered Features
Every call to OpenAI/Claude/Gemini costs money and time: - API calls: $0.01-$0.10 per request - Latency: 500ms-5000ms per call - Rate limits: 60-1000 requests/minute - Non-determinism: Same prompt, different results
For a CI pipeline running 50+ tests 10 times daily: - 500+ API calls/day - $50-500/month just for testing - Flaky tests from non-determinism
Pytest-MockLLM Solution
pip install pytest-mockllm
Basic Usage
import pytest
from pytest_mockllm import mock_openai

@pytest.fixture
def mock_llm():
    with mock_openai() as mock:
        # Configure response
        mock.set_response("Hello! How can I help you today?")
        yield mock

def test_chatbot_greeting(mock_llm, chatbot):
    response = chatbot.send_message("Hi!")

    # Response is deterministic and instant
    assert "help you" in response.lower()

    # Verify the mock was called
    assert mock_llm.call_count == 1
    assert "Hi!" in mock_llm.last_prompt
🔍 Deep Dive: Request Normalization and Matching
To identify which mock response to return, Pytest-MockLLM uses Request Normalization. It doesn't just look for an exact string match (which fails on minor whitespace or formatting changes). Instead, it strips out non-semantic characters, hashes the resulting prompt, and uses a Levenshtein Distance algorithm for "fuzzy" matching. This ensures your tests remain stable even if the underlying prompt template undergoes minor cosmetic refactoring.
Recording and Playback
from pytest_mockllm import record_responses, playback_responses

# Step 1: Record real responses (run once)
@record_responses("./cassettes/chat_flow.json")
def test_chat_flow_record():
    response = openai.ChatCompletion.create(
        model="gpt-4",
        messages=[{"role": "user", "content": "Hello"}]
    )
    assert response is not None

# Step 2: Playback in CI (no API calls)
@playback_responses("./cassettes/chat_flow.json")
def test_chat_flow():
    response = openai.ChatCompletion.create(
        model="gpt-4",
        messages=[{"role": "user", "content": "Hello"}]
    )
    # Uses recorded response, instant, free
    assert "Hello" in response.choices[0].message.content
Chaos Engineering for Edge Cases
from pytest_mockllm import mock_openai, Chaos

def test_handles_timeout():
    with mock_openai() as mock:
        mock.set_chaos(Chaos.TIMEOUT, probability=1.0)

        with pytest.raises(TimeoutError):
            openai.ChatCompletion.create(...)

def test_handles_rate_limit():
    with mock_openai() as mock:
        mock.set_chaos(Chaos.RATE_LIMIT, probability=1.0)

        # Should trigger retry logic
        response = my_app.call_with_retry(...)
        assert response is not None
PII Redaction
from pytest_mockllm import PIIRedactor

# Automatically redact sensitive data from recorded cassettes
redactor = PIIRedactor()
redactor.add_pattern(r"API_KEY_\w+", "[REDACTED_API_KEY]")
redactor.add_pattern(r"\b[A-Za-z0-9._%+-]+@[A-Za-z0-9.-]+\.[A-Z|a-z]{2,}\b", "[EMAIL]")

@record_responses("./cassettes/test.json", redactor=redactor)
def test_with_pii():
    # Personal data automatically scrubbed from recordings
    pass
📋 Parts IV-VI Summary
| Topic | Key Tool | Problem Solved |
|---|---|---|
| Bot Detection | StealthAutomation | Tests blocked by Cloudflare, etc. |
| Shadow DOM | Lumos | Elements hidden in shadow roots |
| AI Selectors | Selector Scout | Brittle, breaking selectors |
| Chatbot Testing | selenium-chatbot-test | Streaming, non-deterministic AI |
| LLM Testing | pytest-mockllm | API costs, flaky AI tests |
PART VII: VISUAL AUTOMATION
When There's No DOM At All
"In a remote desktop, all you have are pixels—and your wits."

Chapter 14: Visual Sonar - Automating Remote Desktops
The Pixelated Frontier
Remote desktop environments present automation's hardest challenge:
| Environment | DOM Access | Accessibility API | What You Get |
|---|---|---|---|
| Web Browser | ✅ Full | ✅ Full | Elements, attributes, structure |
| Native Desktop | ❌ None | ✅ Partial | Some UI elements via UI Automation |
| Remote Desktop (Citrix/VDI) | ❌ None | ❌ None | Only pixels |
When you connect to a Citrix session, all you receive is a video stream. There's no DOM, no accessibility tree, no UI Automation—just an image.
Traditional Approaches and Their Problems
Approach 1: Coordinate-Based Clicking
# Fragile: Breaks if resolution or window position changes
import pyautogui
pyautogui.click(x=500, y=300)

# One resolution change = all tests broken
Approach 2: Image Template Matching
# Better but slow and resolution-dependent
button_location = pyautogui.locateOnScreen('login_button.png')
pyautogui.click(button_location)

# Problems:
# - Different DPI = template doesn't match
# - Different theme = template doesn't match
# - Very slow (scanning entire screen)
Visual Sonar's Innovative Approach
Visual Sonar uses focus ring detection: tracking how the visual focus indicator moves through the interface using keyboard navigation.
┌─────────────────────────────────────────────────────────────────┐
│                   VISUAL SONAR WORKFLOW                          │
├─────────────────────────────────────────────────────────────────┤
│                                                                  │
│  1. SCREEN CAPTURE                                              │
│     Take screenshot of current state                            │
│                                                                  │
│  2. PRESS TAB KEY                                               │
│     Focus moves to next interactive element                     │
│                                                                  │
│  3. SCREEN CAPTURE                                              │
│     Take screenshot of new state                                │
│                                                                  │
│  4. COMPUTE DIFFERENCE                                          │
│     Find pixels that changed between screenshots                │
│                                                                  │
│  5. DETECT FOCUS RING                                           │
│     Changed region = newly focused element                       │
│                                                                  │
│  6. OCR EXTRACTION                                              │
│     Read label text near the focus ring                        │
│                                                                  │
│  7. INTERACTION                                                 │
│     If label matches target, type or click                     │
│                                                                  │
└─────────────────────────────────────────────────────────────────┘
Installation
pip install visual-sonar pytesseract

# Also install Tesseract OCR binary:
# Windows: Download from https://github.com/UB-Mannheim/tesseract/wiki
# Mac: brew install tesseract
# Linux: sudo apt-get install tesseract-ocr
Basic Usage
from visual_sonar import VisualSonar

sonar = VisualSonar()

# Navigate to a field by tabbing until we find it
sonar.tab_to_field("Username")

# Type in the focused field
sonar.type_text("admin@company.com")

# Tab to next field
sonar.tab_to_field("Password")
sonar.type_text("secretpassword")

# Find and click a button by visible text
sonar.click_text("Sign In")

# Or by template image
sonar.click_image("templates/login_button.png")
🔍 Deep Dive: How Focus Ring Detection Works
from visual_sonar import VisualSonar, FocusDetector

detector = FocusDetector(
    focus_ring_colors=["#0078d4", "#005a9e"],  # Common blue focus colors
    min_focus_area=100,                         # Minimum pixel area for focus ring
    max_focus_area=50000,                       # Maximum pixel area
    difference_threshold=30,                    # Pixel intensity difference threshold
)

sonar = VisualSonar(focus_detector=detector)

# The algorithm:
# 1. Capture baseline screenshot
# 2. Press TAB key
# 3. Capture new screenshot
# 4. Compute absolute difference between images
# 5. Find contiguous region of changed pixels
# 6. Verify size matches expected focus ring
# 7. Calculate centroid = element center
Per-Monitor DPI Handling
from visual_sonar import VisualSonar, DPIConfig

# Handle mixed DPI scenarios (common in remote desktop)
dpi_config = DPIConfig(
    auto_detect=True,           # Auto-detect per-monitor DPI
    reference_dpi=96,           # Base DPI for template images
    scaling_interpolation="LANCZOS"  # High-quality scaling
)

sonar = VisualSonar(dpi_config=dpi_config)
Chapter 15: Project Vandal - UI Mutation Testing
What Is Mutation Testing?
Traditional mutation testing modifies source code to verify tests catch bugs. UI Mutation Testing modifies the UI itself:
TRADITIONAL MUTATION TESTING:
  1. Take source code
  2. Introduce bug (mutate)
  3. Run tests
  4. If tests pass → weak test coverage (bug not detected)
  5. If tests fail → good coverage (bug detected)

UI MUTATION TESTING:
  1. Load application
  2. Mutate UI (disable button, hide element, change text)
  3. Run automation tests
  4. If tests pass → "zombie tests" that don't check properly
  5. If tests fail → resilient tests that validate correctly
The "Zombie Test" Problem
Many automation tests pass without actually validating anything:
# This test might be a zombie
def test_submit_form():
    driver.find_element(By.ID, "name").send_keys("John")
    driver.find_element(By.ID, "submit").click()
    # No assertion! Test passes even if form is broken
Project Vandal helps identify these weak tests.
Installation
pip install vandal-testing
Basic Usage
from vandal import Vandal, MutationType

vandal = Vandal(driver)

# Apply mutation: disable the submit button
with vandal.mutate(
    selector="#submit-button",
    mutation=MutationType.STEALTH_DISABLE
):
    # Run your test in this context
    # If test still passes, it's weak!
    run_submit_test()

# Mutation automatically reverted after context exits
🔍 Deep Dive: Mutation Strategies
1. Stealth Disable
Makes element non-functional but visually identical:
MutationType.STEALTH_DISABLE
# JavaScript: element.disabled = true; (for buttons)
# Or: element.style.pointerEvents = 'none';
2. Ghost Element
Hides element from interaction but keeps it in DOM:
MutationType.GHOST_ELEMENT
# JavaScript: element.style.visibility = 'hidden';
# element.style.height = '0'; element.style.overflow = 'hidden';
3. Data Sabotage
Changes text content to verify tests actually read values:
MutationType.DATA_SABOTAGE
# JavaScript: element.textContent = 'VANDALIZED';
# element.value = 'WRONG_VALUE';
4. Logic Sabotage
Breaks JavaScript event handlers:
MutationType.LOGIC_SABOTAGE
# JavaScript: Removes all event listeners from element
Mutation Score
from vandal import VandalRunner

runner = VandalRunner(driver)

# Run mutation testing across your test suite
report = runner.run_mutations(
    test_function=run_checkout_tests,
    selectors=["#add-to-cart", "#checkout", "#pay-now"],
    mutations=[MutationType.STEALTH_DISABLE, MutationType.GHOST_ELEMENT]
)

print(f"Mutation Score: {report.score}%")
# 100% = all mutations detected (tests failed as expected)
# <100% = some mutations not detected (zombie tests exist)

for result in report.results:
    if result.mutation_survived:
        print(f"⚠️ ZOMBIE: {result.test_name} didn't detect {result.mutation}")
PART VIII: REPORTING & OBSERVABILITY
Making Quality Visible
Chapter 16: pytest-glow-report - Enterprise-Grade Reporting
Beyond Developer Output
Standard pytest output serves developers:
test_login.py::test_valid_login PASSED
test_login.py::test_invalid_password FAILED
test_checkout.py::test_add_to_cart PASSED
But stakeholders need: - Executive Summary: Can we release? - Quality Metrics: How stable is the system? - Trend Analysis: Are we improving over time? - Visual Evidence: What was actually tested?
Installation
pip install pytest-glow-report
Configuration
# pytest.ini
[pytest]
addopts = --glow-report=./reports/ --glow-report-title="E-Commerce Test Suite"
Report Features
1. Executive Dashboard
The report header shows: - Overall pass rate with RAG (Red/Amber/Green) status - Quality Score (0-100) - Release Recommendation (Go/No-Go/Conditional) - Test execution time - Environment information
🔍 Deep Dive: The Quality Score Algorithm
# Quality Score formula:
quality_score = (
    pass_rate * 0.5 +           # 50% weight: raw pass rate
    stability * 0.25 +          # 25% weight: test stability over time
    coverage * 0.15 +           # 15% weight: code coverage
    speed * 0.10                # 10% weight: execution time vs baseline
)

# Ratings:
# 90-100: Excellent (Release Ready) ✅
# 75-89:  Good (Minor Issues) ⚠️
# 60-74:  Fair (Needs Attention) ⚠️
# <60:    Poor (Block Release) ❌
3. Screenshot Integration
import pytest

def test_checkout(driver, glow_report):
    driver.get("https://shop.example.com/checkout")

    # Capture step screenshot
    glow_report.screenshot(driver, "checkout_page_loaded")

    driver.find_element(By.ID, "pay-now").click()

    # Capture result
    glow_report.screenshot(driver, "payment_result")

    assert "Order Confirmed" in driver.page_source
4. Failure Clustering
Similar failures are automatically grouped:
- ElementNotInteractableException in login flow (5 occurrences)
- Timeout waiting for #dashboard (3 occurrences)
- Database connection refused (2 occurrences)
PART IX: ENTERPRISE PATTERNS
Architectures That Scale
Chapter 17: The Four-Layer Architecture
Why Framework Architecture Matters
A well-architected framework separates responsibilities, supports parallel development, and localizes changes. Measure maintenance effort in your own codebase rather than assuming a fixed percentage improvement.
🔍 Deep Dive: The Four-Layer Architecture
┌─────────────────────────────────────────────────────────────────┐
│                       TEST LAYER                                 │
│  • Test scenarios and cases                                     │
│  • Business-readable specifications                             │
│  • NO technical implementation details                          │
│                                                                  │
│  test_checkout.py:                                              │
│    def test_guest_can_complete_purchase():                      │
│        cart.add_product("SKU-123")                              │
│        checkout.complete_as_guest()                             │
│        assert order_confirmation.is_displayed()                 │
└───────────────────────────┬─────────────────────────────────────┘
                            │
                            ▼
┌─────────────────────────────────────────────────────────────────┐
│                     BUSINESS LAYER                               │
│  • Page Objects / Screen Objects                                │
│  • Workflow/Journey abstractions                                │
│  • Domain-specific language                                     │
│                                                                  │
│  cart_page.py:                                                  │
│    class CartPage:                                              │
│        def add_product(self, sku):                              │
│            self.search_box.enter(sku)                           │
│            self.add_button.click()                              │
└───────────────────────────┬─────────────────────────────────────┘
                            │
                            ▼
┌─────────────────────────────────────────────────────────────────┐
│                       CORE LAYER                                 │
│  • Base element classes                                         │
│  • Common actions (click, type, select)                         │
│  • Assertion helpers                                            │
│  • Data utilities                                               │
│                                                                  │
│  base_element.py:                                               │
│    class BaseElement:                                           │
│        def click(self):                                         │
│            self.wait_for_clickable()                            │
│            self._element.click()                                │
└───────────────────────────┬─────────────────────────────────────┘
                            │
                            ▼
┌─────────────────────────────────────────────────────────────────┐
│                  INFRASTRUCTURE LAYER                            │
│  • WebDriver management                                         │
│  • Configuration loading                                        │
│  • Reporting integration                                        │
│  • CI/CD hooks                                                  │
│                                                                  │
│  driver_factory.py:                                             │
│    class DriverFactory:                                         │
│        def create(self, browser, headless):                     │
│            ...                                                  │
└─────────────────────────────────────────────────────────────────┘
Layer Principles
| Layer | Knows About | Does NOT Know About |
|---|---|---|
| Test | Business | Core, Infrastructure |
| Business | Core | Infrastructure |
| Core | Infrastructure | Tests, Business logic |
| Infrastructure | Nothing above | — |
API-First Test Data Strategy
# ❌ DON'T: Create test data through UI (slow, fragile)
def test_order_history(driver):
    login(driver)
    add_product(driver)       # Takes 30 seconds
    checkout(driver)          # Takes another 30 seconds
    navigate_to_history(driver)
    assert_order_visible(driver)

# ✅ DO: Seed data via API, test only the UI part you care about
def test_order_history(driver, api_client):
    # Fast API-based setup (< 1 second)
    user = api_client.create_user()
    order = api_client.create_order(user.id, products=["SKU-1"])

    # Restore session
    login_via_teleport(driver, user)

    # Only test the UI part we're verifying
    navigate_to_history(driver)
    assert_order_visible(driver, order.id)
Chapter 18: CI/CD Integration Patterns
GitHub Actions Best Practices
Matrix Testing
name: Cross-Browser Tests

on: [push, pull_request]

jobs:
  test:
    runs-on: ubuntu-latest
    strategy:
      fail-fast: false
      matrix:
        browser: [chrome, firefox, edge]
        python-version: ['3.10', '3.11', '3.12']

    steps:
      - uses: actions/checkout@v4

      - name: Setup Python ${{ matrix.python-version }}
        uses: actions/setup-python@v5
        with:
          python-version: ${{ matrix.python-version }}

      - name: Run tests on ${{ matrix.browser }}
        run: pytest tests/ --browser=${{ matrix.browser }}
Artifact Management
      - name: Upload test reports
        if: always()
        uses: actions/upload-artifact@v4
        with:
          name: test-reports-${{ matrix.browser }}
          path: |
            reports/
            screenshots/
          retention-days: 30
Caching Dependencies
      - name: Cache pip packages
        uses: actions/cache@v4
        with:
          path: ~/.cache/pip
          key: ${{ runner.os }}-pip-${{ hashFiles('requirements.txt') }}
          restore-keys: |
            ${{ runner.os }}-pip-
PART X: SPECIALIZED ENVIRONMENTS
Chapter 19: WVDAutomation - Windows Virtual Desktop
The WVD Challenge
Windows Virtual Desktop (Azure Virtual Desktop) sessions present: - Different connection methods than Citrix - Azure AD authentication - Session persistence challenges - Scaling across multiple hosts
Installation
pip install wvdautomation
Basic Usage
from wvdautomation import WVDSession

session = WVDSession(
    workspace_url="https://rdweb.wvd.microsoft.com/...",
    username="user@company.com",
    password=os.environ["WVD_PASSWORD"]
)

with session.connect() as desktop:
    # Now you have a Pyautogui-like interface
    desktop.click_text("Microsoft Edge")
    desktop.wait_for_window("Edge")
    desktop.type_text("https://internal-app.company.com")
PART XI: ADVANCED TOPICS
Chapter 20: Effort Estimation for Automation Projects
The Estimation Problem
Automation estimation is notoriously inaccurate: - "This should take 2 hours" → 2 days - "Simple login automation" → 3 weeks (with SSO, MFA, session handling) - "Just automate the happy path" → But what about error states?
The Five-Step Framework
Step 1: Decompose Ruthlessly
Rule: If a task can't be broken into pieces under 4 hours, you don't understand it yet.
BAD:  "Automate login flow" (1 vague task)

GOOD: "Automate login flow":
  ├── Analyze login page structure (2h)
  ├── Create LoginPage object (2h)
  ├── Implement valid login test (2h)
  ├── Handle invalid credentials (1h)
  ├── Handle locked account (1h)
  ├── Handle SSO redirect (4h)
  ├── Handle MFA flow (4h)
  └── Create test data fixtures (2h)

TOTAL: 18h (not "4 hours")
Step 2: Classify by Complexity
| Complexity | Examples | Multiplier |
|---|---|---|
| SIMPLE | Static content, standard forms | 1x |
| MEDIUM | Dynamic content, validation, modals | 2x |
| COMPLEX | Multi-step wizards, real-time updates, file handling | 4x |
Step 3: Apply Base Estimates
| Component | Simple | Medium | Complex |
|---|---|---|---|
| Page Object | 2h | 4h | 8h |
| Form Field | 0.5h | 1h | 2h |
| Table/Grid | 2h | 4h | 8h |
| Modal/Dialog | 1h | 2h | 4h |
| API Integration | 2h | 4h | 8h |
Step 4: Add Multipliers
Environment factors:
  × 1.5 for legacy system without data-testid attributes
  × 1.3 for Shadow DOM heavy apps
  × 1.5 for mobile/responsive testing
  × 2.0 for first project in new technology

Team factors:
  × 0.8 if team has done similar before
  × 1.5 for new team members
  × 1.2 for distributed teams
Step 5: Buffer for Unknowns
Confidence level → Buffer:
  High confidence (done before):   +20%
  Medium confidence (similar):     +40%
  Low confidence (new territory):  +80%
Chapter 21: SQL for Automation Testers
Why SQL Matters
Automation often requires: - Verifying data persistence - Seeding test data - Cleaning up after tests - Diagnosing failures
Common Optimization Patterns
Anti-Pattern 1: Non-SARGable Predicates
-- ❌ BAD: Function on column prevents index use
SELECT * FROM orders WHERE YEAR(created_at) = 2024;

-- ✅ GOOD: SARGable (Search ARGument ABLE)
SELECT * FROM orders
WHERE created_at >= '2024-01-01'
  AND created_at < '2025-01-01';
Anti-Pattern 2: SELECT *
-- ❌ BAD: Retrieves way more data than needed
SELECT * FROM users WHERE id = 123;

-- ✅ GOOD: Only needed columns
SELECT id, email, name FROM users WHERE id = 123;
Index Strategy
-- For frequently queried columns:
CREATE INDEX idx_users_email ON users(email);

-- For composite queries:
CREATE INDEX idx_orders_user_date ON orders(user_id, created_at);
Chapter 22: Legacy Lessons - Wisdom from UFT/QTP
What the Old Guard Got Right
Despite being "legacy," UFT/QTP established patterns still valuable today:
1. Centralized Object Repository
# Modern implementation in Python
class ObjectRepository:
    class Amazon:
        class HomePage:
            SEARCH_BOX = (By.ID, "twotabsearchtextbox")
            SEARCH_BUTTON = (By.ID, "nav-search-submit-button")

        class ResultsPage:
            PRODUCT_LIST = (By.CSS_SELECTOR, "div.s-result-item")
2. Recovery Scenarios
from functools import wraps

def with_recovery(max_retries=3):
    def decorator(func):
        @wraps(func)
        def wrapper(self, *args, **kwargs):
            for attempt in range(max_retries):
                try:
                    return func(self, *args, **kwargs)
                except UnexpectedAlertPresentException:
                    self.driver.switch_to.alert.dismiss()
                except StaleElementReferenceException:
                    time.sleep(0.5)
            raise Exception(f"Failed after {max_retries} recovery attempts")
        return wrapper
    return decorator
Chapter 23: AI-Powered Testing - Privacy-First & Local SLMs
Separate three kinds of evidence
An AI feature has deterministic software around a variable model. Test those layers separately so a failing network call, a malformed tool argument, and a poor answer do not collapse into one vague failure.
| Layer | What to test | Evidence |
|---|---|---|
| Integration | Request structure, parsing, timeouts, cancellation, retries | Deterministic fixtures and contract assertions |
| Model behavior | Task quality across representative and adversarial inputs | A versioned evaluation set and a scored rubric |
| Agent execution | Tool selection, permitted actions, actual state changes | A trace tied to independent postconditions |
Local models: a deployment choice
Local inference can reduce dependence on external APIs, but it does not guarantee privacy, predictable latency, or zero cost. Audit telemetry, logs, model downloads, access controls, hardware contention, and data retention. Compare local and hosted options using your own workload and quality thresholds.
Treat locator healing as a proposal
A model may suggest a replacement selector. That suggestion must not silently change what a regression test means. Preserve the original failure, capture the candidate and its context, check that it identifies one expected target, and require review before updating the test contract.
def validate_locator_candidate(driver, css_selector, expected_tag):
    # Validation only: this function never clicks or changes the saved locator.
    matches = driver.find_elements("css selector", css_selector)
    if len(matches) != 1:
        raise AssertionError("Candidate must identify exactly one element")
    candidate = matches[0]
    if candidate.tag_name.lower() != expected_tag.lower():
        raise AssertionError("Candidate has the wrong element type")
    if not candidate.is_displayed() or not candidate.is_enabled():
        raise AssertionError("Candidate is not currently actionable")
    return candidate
This check is deliberately incomplete: uniqueness and visibility do not establish business identity. Validate an accessible name or another stable domain attribute and the resulting application state. Invalid selector syntax should fail validation rather than trigger another unbounded model call.
Fixtures are not model evaluations
A recorded or synthetic response is useful for testing your application’s handling of an output. It does not prove that a live model will produce a correct answer. Keep offline integration checks separate from a smaller, controlled evaluation run against the configured model.
- Include malformed JSON, missing fields, tool failures, refusal, timeout, and cancellation cases.
- For streaming, test partial output, disconnects, completion signals, and cleanup.
- Record model identity, prompt version, evaluation data version, and scoring rules.
- Review a sample of failures and successes; avoid treating answer length or a model’s own confidence as correctness.
A practical release gate
Require deterministic integration tests to pass, inspect changes on a fixed evaluation set, and verify that execution stayed within allowed actions. Define thresholds before comparing candidates. For a failed run, save the input, relevant redacted output, tool trace, expected result, and observed state.
Chapter 24: The Sentinel - Toward Fully Autonomous Quality Agents
Architecture proposal. The Sentinel is a design for coordinating test tools and agent actions. This chapter describes contracts to implement and evaluate; it is not a claim that a fully autonomous quality system has been delivered.
Give each component one responsibility
| Component | Responsibility | Must not do |
|---|---|---|
| Observer | Capture page, command, and environment evidence | Declare success from logs alone |
| Planner | Propose an action and its expected outcome | Execute outside the policy boundary |
| Policy gate | Check scope, permissions, budget, and prior outcomes | Interpret a timeout as permission |
| Executor | Run an approved action with a bounded deadline | Retry irreversible actions blindly |
| Verifier | Check independent postconditions and record evidence | Trust an agent’s self-reported completion |
Make the state machine explicit
observe → propose → authorize → execute → verify
                       ↓           ↓          ↓
                    blocked      failed    complete / unresolved
Use a run identifier and an action identifier across every transition. Preserve the original plan, authorization decision, timestamps, tool result, and verification record. A subprocess exiting successfully is useful evidence; it does not establish that a requested deployment, edit, or transaction actually happened.
Design the failure boundaries first
- Timeout: stop or cancel work where possible and report unknown state until verification resolves it.
- Retry: check whether the outcome already exists and whether the operation is safe to repeat.
- Disagreement: retain conflicting evidence and require review rather than choosing the most confident answer.
- Budget exhaustion: return an incomplete result with artifacts and a bounded next step.
Validate the coordinator
Start with a read-only diagnostic flow. Inject a missing artifact, a hanging command, a repeated request, and a misleading success message. The coordinator should distinguish failed, blocked, unresolved, and verified completion without losing the evidence from the first attempt.
Chapter 25: Constellation Based Automation - The Milky Way Strategy
Architecture proposal. Constellation Based Automation separates test intent from environment coordination. A hub owns the browser session while small services observe or handle explicitly permitted conditions. The design can complement page objects; it does not remove the need for stable interfaces, assertions, or maintenance.
Keep one owner of browser actions
Concurrent services can race to click, navigate, or restore authentication. Route every mutation through the hub. Give a service a time-limited action lease, reject stale commands, and release the lease after completion or cancellation.
| Role | Useful responsibility | Boundary |
|---|---|---|
| Hub | Own the session and order actions | One mutation at a time |
| Waiter | Report relevant readiness signals | Quietness is not correctness |
| Environment handler | Dismiss explicitly recognized, nonessential overlays | Never hide an unexpected error or a business-critical consent flow |
| Historian | Record events and approved state snapshots | Redact secrets and isolate identities |
Define the protocol contract
A message needs a protocol version, run ID, action ID, deadline, operation, and scoped parameters. The reply should distinguish accepted, rejected, complete, and unresolved. Keep transport-level success separate from successful execution.
{
  "protocolVersion": 1,
  "runId": "run-042",
  "actionId": "action-007",
  "operation": "check-readiness",
  "timeoutMs": 2000,
  "parameters": {"target": "checkout-submit"},
  "requiresApproval": false
}
This is an illustrative application envelope, not a published protocol specification. Agree on authentication, schema validation, compatibility, cancellation, and duplicate-message handling before connecting services.
A timeout is a policy decision
There is no universal handshake budget. Measure service latency and define separate deadlines for observation and mutation. A missing readiness response should leave an action blocked or unresolved; do not proceed merely to keep the test fast.
Make interventions visible
Record the original intent, the condition that triggered an intervention, the policy that allowed it, and before/after evidence. Preserve unexpected overlays in failure artifacts. Compare runs with and without the coordinator to detect cases where helpful recovery is hiding a regression.
Start with one controlled experiment
- Choose one flow and one known, nonessential overlay.
- Run the observer without allowing mutations and classify its proposed interventions.
- Enable one approved intervention and verify the business outcome independently.
- Inject a delayed response, a duplicate event, and an unrecognized overlay.
- Compare false interventions, runtime, and diagnostic quality before expanding the design.
APPENDICES
Appendix A: The Complete Toolkit
Every project in this book is open-source and available:
| Tool | Problem | GitHub | PyPI | Blog |
|---|---|---|---|---|
| Waitless | Flaky tests | github.com/godhiraj-code/waitless | PyPI | Blog |
| Visual Guard | Visual regression | github.com/godhiraj-code/visual-guard | PyPI | Blog |
| Selenium Teleport | Slow authentication | github.com/godhiraj-code/selenium-teleport | PyPI | Blog |
| StealthAutomation | Bot detection | github.com/godhiraj-code/stealthautomation | PyPI | Blog |
| Lumos ShadowDOM | Shadow DOM traversal | github.com/godhiraj-code/lumos-shadowdom | PyPI | Blog |
| Chatbot Test | AI chatbot testing | github.com/godhiraj-code/selenium-chatbot-test | PyPI | Blog |
| pytest-mockllm | LLM testing | github.com/godhiraj-code/pytest-mockllm | PyPI | Blog |
| Visual Sonar | Remote desktop & VDI automation | github.com/godhiraj-code/visual-sonar | PyPI | Blog |
| pytest-glow-report | Enterprise reporting | github.com/godhiraj-code/pytest-glow-report | PyPI | Blog |
| Project Vandal | UI mutation testing | github.com/godhiraj-code/vandal | PyPI | Blog |
Appendix B: Common Exception Reference
| Exception | Cause | Solution |
|---|---|---|
NoSuchElementException |
Element not in DOM | Wait for presence, check selector |
ElementNotInteractableException |
Element exists but can't be interacted with | Wait for clickable, check visibility |
StaleElementReferenceException |
Element was removed/re-added to DOM | Re-find element, use Waitless |
TimeoutException |
Wait condition not met in time | Increase timeout, check condition |
WebDriverException |
Browser/driver communication issue | Restart browser, check versions |
ElementClickInterceptedException |
Another element covering target | Scroll to view, wait for overlays |
Appendix C: Glossary
| Term | Definition |
|---|---|
| DOM | Document Object Model - tree structure of HTML elements |
| Shadow DOM | Encapsulated DOM tree hidden from main document |
| Light DOM | Regular DOM, visible to querySelector |
| WebDriver | W3C protocol for browser automation |
| CDP | Chrome DevTools Protocol - direct browser control |
| Flakiness | Tests that intermittently pass/fail without code changes |
| SSIM | Structural Similarity Index - perceptual image comparison |
| pHash | Perceptual Hash - image fingerprinting algorithm |
| SARGable | Search ARGument-able - query can use indexes |
| Mutation Testing | Introducing bugs to verify test coverage |
| TTFT | Time to First Token - latency metric for streaming |
Conclusion
The Modern Automation Engineer's Manifesto
After 10+ years of building, breaking, and rebuilding automation frameworks, these truths have emerged:
Truth 1: Flakiness Is a Design Problem, Not a Fate
Every flaky test has a root cause. The tools in this book—Waitless, intelligent waits, stability detection—exist because understanding those causes leads to solutions.
Truth 2: The Browser Is an Adversary to Be Tamed
Browsers weren't designed for automation. They load asynchronously, animate without notice, and guard their shadows. Success comes from instrumenting the browser itself, not fighting its nature.
Truth 3: Speed Without Reliability Is Waste
A fast, flaky test suite is worse than no suite at all. It generates false signals, wastes developer time, and erodes trust. Build stability first, then optimize for speed.
Truth 4: The Best Test Is the One That Catches Bugs
Automation isn't about coverage percentages or green dashboards. It's about catching defects before they reach users. Every test should have a clear purpose: what bug would it catch?
Truth 5: Invest in Tooling
Hours spent building reusable tools save days of repetitive work. The projects in this book exist because solving problems once, properly, beats solving them poorly forever.
The Complete Toolkit
Every project in this book is open-source and available:
| Tool | Problem | GitHub | PyPI | Blog |
|---|---|---|---|---|
| Waitless | Flaky tests | github.com/godhiraj-code/waitless | PyPI | Blog |
| Visual Guard | Visual regression | github.com/godhiraj-code/visual-guard | PyPI | Blog |
| Selenium Teleport | Slow authentication | github.com/godhiraj-code/selenium-teleport | PyPI | Blog |
| StealthAutomation | Bot detection | github.com/godhiraj-code/stealthautomation | PyPI | Blog |
| Lumos ShadowDOM | Shadow DOM traversal | github.com/godhiraj-code/lumos-shadowdom | PyPI | Blog |
| Chatbot Test | AI chatbot testing | github.com/godhiraj-code/selenium-chatbot-test | PyPI | Blog |
| pytest-mockllm | LLM testing | github.com/godhiraj-code/pytest-mockllm | PyPI | Blog |
| Visual Sonar | Remote desktop & VDI automation | github.com/godhiraj-code/visual-sonar | PyPI | Blog |
| pytest-glow-report | Enterprise reporting | github.com/godhiraj-code/pytest-glow-report | PyPI | Blog |
| Project Vandal | UI mutation testing | github.com/godhiraj-code/vandal | PyPI | Blog |
© 2025 Dhiraj Das. All rights reserved.